For many, cooking is one of the pleasures of hanging out in camp – especially with a large group. Having a Dutch oven is like bringing your kitchen along. You can create virtually any food in camp that you can make at home.
The Dutch oven is a heavy, flat-bottomed kettle with a lid, legs, and wire handle. Traditional Dutch ovens are made of thick cast iron which absorbs heat, retains it, and distributes it evenly over the inside surface. It was designed to cook complete one-pot meals over an open fire. The legs allow you to set the pot over coals, and the lid allows you to add coals to the top for even, all-around heat. Here are some of the things you can do with a Dutch oven:
- Simmer, boil, steam - a Dutch oven is just a heavy-duty pot with a lid, so any thing you can do in a typical pot you can do in a Dutch oven. Think: simmering soups, steaming rice, boiling water for pasta.
- Sear, pan-fry, sauté, deep fry - a Dutch oven is also a great stand-in for a cast-iron skillet. You can place it on the grill grate or settle it into the coals on its legs to sear steaks, brown chicken thighs, sauté vegetables, or deep fry French fries.
- Bake - the real advantage of a Dutch oven is its ability to function like an oven. By placing hot coals on the lid and underneath the body, the interior of the Dutch oven is heated equally. This allows you to bake just about anything, which is what I use if for most.
- Braise - similar to baking, braising requires dual-direction heat. The food is cooked in a small amount of liquid which is trapped by the lid creating a moist, “low and slow” cooking environment.
For my 10" Dutch oven, 24 charcoal briquettes (1/3 below, 2/3 on lid) produces a temperature of around 350 degrees for baking. You probably won't be see a Dutch oven on a backpacking trip, but for canoe camping you’ll be glad you brought one along. Here are a few of my favorite recipes.
 |
| Henry making Dump Cake |
Henry’s Blueberry “Dump Cake”
Two cans of blueberry pie filling
One box of white or yellow cake mix
One can of lemon/lime soda
This was the first recipe that I tried in my Dutch oven, and one of the easiest. Line the Dutch oven with foil and spray with cooking spray. Add the two cans of pie filling into the bottom of the Dutch oven. Next, sprinkle the cake mix over the pie filling in an even layer. Finally, pour the lemon/lime soda over the cake mix. At this point you have a decision to make – to stir or not to stir. If you stir the soda into the cake mix, your dump cake will cook with the consistency of a cake. If you don’t stir, it will cook with the consistency of a cobbler. Set the Dutch oven over coals or charcoal with 1/3 of the coals below, and 2/3 of the coals on the lid (most of the heat should be on the lid). Cook for around 30 minutes turning frequently to prevent hot spots. You can experiment with different canned or fresh fruits.
 |
| Blueberry Breakfast Bake |
Blueberry Breakfast Bake
1-cup milk
4 eggs
1/4-cup sour cream
1/2-cup sugar
1/4-teaspoon cinnamon
1/4-teaspoon vanilla
1-cup fresh blueberries
8 slices of bread
Mable syrup - optional
Line the Dutch oven with foil and spray with cooking spray. Mix the milk, eggs, sour cream, sugar, cinnamon, and vanilla together and store in a sealable travel container. This can be kept in your cooler until your ready to make breakfast. Cut the bread into cubes and place in the Dutch oven with the fresh blueberries. Pour the milk/egg mixture over the top and mix until the bread and blueberries are coated. Set the Dutch oven over coals or charcoal with 1/3 of the coals below, and 2/3 of the coals on the lid (most of the heat should be on the lid). Cook for around 30 minutes, turning frequently to prevent hot spots. This breakfast is nice and sweet on its own, but I like it with a little maple syrup on top. You can replace the blueberries with other fresh, frozen or canned fruit.
 |
| Blueberry Bake with Dan's Peach Sauce |
Dan’s Peach Sauce
Fresh peaches
Couple tablespoons Butter
Couple of tablespoons Sugar
Dice the peaches. Place in pan with butter and sugar. Place over low heat until the peaches soften and release their juices and the butter and sugar combine to create a thick sauce. Dan cooked this with fresh peaches to top our Blueberry Breakfast Bake on one of our
Allagash trips. You can do it with other fresh, frozen or caned fruit.
 |
| Frittata for breakfast |
Potato and Cheese Frittata (with whatever else you want to add)
1 package frozen home fries
6-8 eggs
2 cups cheese (pick your favorite)
Other fillings can include chopped onions, peppers, mushrooms, ham, bacon or sausage
Line the Dutch oven with foil and spray with cooking spray. In separate pan, cook frozen home fries until browned and add to the bottom of the Dutch oven. Saute other fillings and add to the Dutch oven. Sprinkle with 3/4 of the cheese. Whisk the eggs and add to the Dutch oven, swirling to make sure it is even distributed. Top with remaining cheese. Set the Dutch oven over coals or charcoal with 1/3 of the coals below, and 2/3 of the coals on the lid (most of the heat should be on the lid). Cook for around 30 minutes, turning frequently to prevent hot spots.
 |
| Lasagna with onions and peppers |
Lasagna
1 package no-boil lasagna noodles
15 oz ricotta cheese
1 egg
1/4 cup grated parmesan cheese
4 cups mozzarella cheese
28 oz jar of sauce (a little more is better)
Other fillings can include chopped onions, chopped peppers, chopped mushrooms, ground beef or chopped Italian sausage
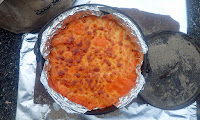
Mix the ricotta cheese, egg, and parmesan cheese together and set aside (you can do this in advance and store in your cooler in a zip-lock plastic bag). In a separate pan saute the other fillings (you can also do this in advance and store in a plastic zip-lock bag in your cooler). Line the Dutch oven with foil and spray with cooking spray. Add a small amount of sauce to the bottom of the Dutch oven - enough to coat. Break the lasagna noodles to form a single layer in the Dutch oven (it doesn't have to be perfect, the noodles will expand as they cook). Layer half the ricotta cheese mixture, half the fillings, a third of the mozzarella cheese and a third of the sauce. Repeat for a second layer. Top with a last layer of noodles and the remaining sauce and cheese. Set the Dutch oven over coals or charcoal with 1/3 of the coals below, and 2/3 of the coals on the lid (most of the heat should be on the lid). Cook for around an hour, turning frequently to prevent hot spots. You may need to add more coals if it loses heat.
 |
| Baked Ziti |
Baked Ziti
16 oz box of ziti
4 cups water
28 oz jar of sauce
8 oz ricotta cheese
1/4 cup grated parmesan cheese (if you have it)
2 cups (one package) grated mozzarella cheese
Other fillings can include chopped onions, chopped peppers, chopped mushrooms, ground beef or chopped Italian sausage
Mix the water, sauce, ricotta and parmesan cheese together and set aside (you can do this in advance and store in your cooler in a sealable travel container). Place the Dutch oven in the coals and sauté the fillings (you can also do this in advance and store in a plastic zip-lock bag in your cooler). Add the liquid mixture and bring to a low boil. Add the uncooked ziti and cook, stirring frequently until the pasta is cooked and the liquid has been absorbed. Remove Dutch oven from the coals and top with mozzarella cheese. Place the cover and coals on the top and bake until cheese is melted and golden brown - 30 to 45 minutes.
 |
| Cinnamon Rolls |
Yeast Breads – Cinnamon Rolls
The easiest way to make yeast breads in camp is to make the dough in advance (night for cinnamon rolls and morning for dinner rolls) and let the dough do its first rise in the cooler. Or make the dough at home and keep it in a ziplock bag in the cooler until you need it. When you are ready to bake, take out the dough that you need, shape and let it do its second rise, and bake. Here is my grandmother’s recipe for cinnamon rolls.
For dough:
1 package dry active yeast
4 cups flour
¾ cup of sugar
1 cup milk
One stick butter
Dash of salt
2 large eggs
 |
| The rolls are ready |
In a bowl, mix flour with yeast. Warm milk, butter, salt and sugar in pan until butter is melted and sugar dissolved. In separate bowl whisk egg. Whisking constantly, slowly add milk mixture to the eggs. Add liquid to dry ingredients to form a dough and knead until smooth – 6 to 8 minutes. Spray a plastic bag with vegetable spray and store in cooler.
For filling:
½ cup brown sugar
¾ cup sugar (1/2 cup for filling, ¼ cup for dipping)
2-3 tablespoons of cinnamon
One stick butter (6 tablespoons for filling, 2 tablespoons for dipping)
When ready to use, line the Dutch oven with foil and spray with cooking spray. Punch down dough, divide in half and roll into a 5” by 12” square. Melt butter and spread 6 tablespoons on the dough. Top with mixture of brown sugar, ½ cup sugar and cinnamon. Roll into a log from the short side, and cut into 5 1" pieces. Dip in remaining butter and remaining sugar and place in Dutch oven sugar side up. Allow to rise while the charcoal fires and reaches a grey coating of ash. Set the Dutch oven over coals or charcoal with 1/3 of the coals below, and 2/3 of the coals on the lid (most of the heat should be on the lid). Cook for around 30 minutes, turning frequently to prevent hot spots.
This recipe will make 10 large cinnamon rolls, but you can bake them half at a time with the remaining dough staying in the cooler. In cold weather you will need to warm the Dutch oven in advance.
Yeast Bread – Dinner Rolls
This dough can also be modified for dinner rolls
1 package dry active yeast
4 cups flour
1/3 cup of honey
1 cup milk
6 tablespoons butter
Dash of salt
1 large egg
In a bowl, mix flour with yeast. Warm milk, butter, salt and honey in pan until butter is melted and honey is dissolved. In separate bowl whisk egg. Whisking constantly, slowly add milk mixture to the eggs. Add liquid to dry ingredients to form a dough and knead until smooth – 6 to 8 minutes. Spray a plastic bag with vegetable spray and store in cooler.
When ready to use, line the Dutch oven with foil and spray with cooking spray. Punch down dough and form into ball. Divide and shape into balls, pulling down the sides, pinching the bottom, and setting in Dutch oven just touching, seam side down. Allow to rise while the charcoal fires and reaches a grey coating of ash. Set the Dutch oven over coals or charcoal with 1/3 of the coals below, and 2/3 of the coals on the lid (most of the heat should be on the lid). Cook for around 30 minutes, turning frequently to prevent hot spots.
This recipe will make 16 dinner rolls, but you can bake them half at a time with the remaining dough staying in the cooler. I have also done half as dinner rolls and half as cinnamon rolls.
 |
| Dough pressed out in the Dutch oven |
Yeast Bread - Pizza
For the dough :
3 cups bread flour
2 tablespoons sugar
1 ½ teaspoon salt
Package of dry active yeast
1 1/3 cup water
1 tablespoon olive/vegetable oil
In a bowl, mix flour, sugar, salt and yeast. Add water and oil to dry ingredients to form a dough and knead until smooth – 6 to 8 minutes. Spray a plastic bag with vegetable spray and store in cooler. Dough can stored in the cooler for several days.
 |
| Pizza out of the Dutch oven |
F
or the sauce and toppings:Tomato Sauce
Mozzarella cheese
Peperoni, onions, pepper or whatever toppings you want to use.
When ready to use, line the Dutch oven with foil and spray with cooking spray. Punch down dough, divide in half and knead until smooth. Stretch out the dough in a circle and place in Dutch oven, pressing out until you have a thin layer across the bottom out to the sides. Top with tomato sauce, cheese and whatever topping you want to use. Set the Dutch oven over coals or charcoal with 1/3 of the coals below, and 2/3 of the coals on the lid (most of the heat should be on the lid). Cook for around 30 minutes, turning frequently to prevent hot spots. Makes two pizzas, or one loaf of bread. Top bread with olive oil and rosemary.
 |
| Biscuits baking in a Campers Kitchen |
Bakewell Cream Biscuits
4 cups flour
4 tsp Original Bakewell Cream
2 tsp baking soda
1 tsp salt
½ cup (8 tbsp) shortening (or butter)
1 ½ cups milk (powdered milk is fine)
 |
| Best strawberry shortcake ever! |
Mix dry ingredients and cut-in shortening (food processor does this quick, or freeze and grate). Place in ziplock bag. Place powdered milk in small ziplock bag - they can be stored together. In camp, add water to powdered milk and add to biscuit mix to make dough. Knead lightly - do not over knead as it makes the biscuits tough. Cut into biscuits and set in the Dutch oven, coating the top with melted butter. Set the Dutch oven over coals or charcoal with 1/3 of the coals below, and 2/3 of the coals on the lid (most of the heat should be on the lid). Cook for around 30 minutes, turning frequently to prevent hot spots.
Bakewell Cream Cinnamon Rolls
Bakewell Cream biscuit mix (you can also use 2 cans of Pillsbury biscuits)
1 stick (8 tbsp) melted butter
½ cup brown sugar
½ cup white sugar
3 tbsp ground cinnamon
Add sugars and cinnamon to melted butter to make a paste. Place in ziploc bag. In camp, roll out biscuit dough in a rectangle. Cover with sugar/cinnamon paste. Roll up in a log and cut in 2” pieces. and set in the Dutch oven, coating the top with melted butter and sugar. Set the Dutch oven over coals or charcoal with 1/3 of the coals below, and 2/3 of the coals on the lid (most of the heat should be on the lid). Cook for around 30 minutes, turning frequently to prevent hot spots.
Monkey Bread
Bakewell cream biscuit mix (you can also use 2 rolls of Pillsbury biscuits)
½ cup sugar
½ cup brown sugar
3 tbsp cinnamon
1 stick (8 tbsp) melted butter
Line the Dutch oven with foil and spray with cooking spray. In camp, roll out biscuit dough and cut into small pieces. Mix sugars and cinnamon in plastic bag. Drop each piece into the sugar and shake to coat well. Place the coated biscuit pieces in the Dutch oven. In a separate pan, melt the butter and pour over biscuits. Set the Dutch oven over coals or charcoal with 1/3 of the coals below, and 2/3 of the coals on the lid (most of the heat should be on the lid). Cook for around 30 minutes, turning frequently to prevent hot spots.
Brownies
One box Brownie mix
Oil, eggs and water as called for by the mix
You could make your own, but it is easier to use a mix. I mix the wet ingredients together in advance according to the package directions and store in a sealable travel container in the cooler. When it is time to cook the brownies, line the Dutch oven with foil and spray with cooking spray. Mix the brownie mix with the wet ingredient and pour into Dutch oven. Set the Dutch oven over coals or charcoal with 1/3 of the coals below, and 2/3 of the coals on the lid (most of the heat should be on the lid). Cook for around 30 minutes, turning frequently to prevent hot spots. You can also mix in nuts, chocolate bits, M&M's or mini marshmallows. If you don't have your Dutch oven you can also use
wet heat.
8 potatoes
1 onion
3 cups milk – made from powder
3 tbsp butter
½ cup all-purpose flour
1 tsp salt
1 tsp pepper
Line the Dutch oven with foil and spray with cooking spray. Combine flour, salt and pepper and set aside. Mix milk and set aside. Slice potatoes into thin slices and chop onion. Put a thin layer of potatoes and onion in the bottom of the Dutch oven. Sprinkle a spoonful of the flour mixture over the potatoes. Alternate layers of potatoes, onions and flour mixture. Add milk until the liquid is ½ inch below the surface of the potatoes. Sprinkle butter around the edges of the pan. The butter will combine with the milk and flour to make a thick, creamy sauce. Set the Dutch oven over coals or charcoal with 1/3 of the coals below, and 2/3 of the coals on the lid (most of the heat should be on the lid). Cook for around 60 minutes turning frequently to prevent hot spots.
 |
| Deep frying French Fries |
French Fries
French Fries (fresh cut or frozen)
Oil to cover
Add oil to the Dutch oven and settle down in the coals. Once the oil reaches 350 degrees add the French Fries, stirring occasionally until they are evenly browned. It is helpful to have a thermometer to monitor the oil temperature. A Therma Pro meat thermometer works fine, as would an infrared temperature gun. Dealing with the oil after cooking is kind of a pain. We poured it back in the bottle and took it home with us. You could also re-use it on the trip to fry other stuff.
Apple Crisp |
| Apple Crisp |
8-10 Granny Smith Apples (dehydrated)
1 teaspoon Cinnamon
Dash of Nutmeg
For topping:
¾ cup of Flour
½ cup Brown Sugar
½ cup Granulated Sugar
1 stick of Butter
Peel and core the Granny Smith Apples and cut into ½ inch slices for dehydrating. To rehydrate apples, add 2 cups boiling water and let sit for at least an hour. To make the topping, combine flour, brown sugar and sugar. Cut in butter until the mixture is crumbly and the size of small peas. Topping can be made in advance and stored in a zip-lock bag in the cooler.
Line the Dutch oven with foil and spray with cooking spray. Add the apples with any remaining liquid (should be about 1/2 cup), cinnamon and nutmeg. Sprinkle topping over apples. Set the Dutch oven over coals or charcoal with 1/3 of the coals below, and 2/3 of the coals on the lid (most of the heat should be on the lid). Cook for around 45 minutes, turning frequently to prevent hot spots. Let cool for around 15 minutes before serving. Tasty on its own, but even better with whipped cream.
If making with fresh apples, peal and slice apples as above, add 1/2 cup of water to the apples with the cinnamon and nutmeg, and top as above.