Showing posts with label safety. Show all posts

Thursday, February 20, 2025

Using a Throw Bag

Different throw bag sizes and styles
The throw bag is one of the most versatile pieces of equipment that a river paddler can carry. You can use it as a throw rope to belay a swimmer out of a rapid, as a static line or in a Z-drag to pull a boat out of a pin, as a rope to drag your boat or raise it up/down a drop during a portage, or to set up your dining fly or clothes line in camp. The bag that you choose depends on what you plan to do with it. 

Length of rope – for throwing, the length of the rope should be determined by the length that you can accurately throw. 50' is generally the minimum for a throw bag. 100' is better for setting up a pull, but may be too heavy and bulky to throw accurately. 75' is a happy medium

Setting safety below a drop
Diameter of rope – once again, the diameter of the rope will be influenced by its use.1/4" rope is light and easy to throw. 3/8" is stronger for pulls, but heavier to throw. 5/16" is a happy medium.

Type of rope – the rope should be colorful for visibility and float on the water to prevent snags and make it easy for the swimmer to grab. The material is usually Poly, Spectra or a combination of the two. Poly rope is soft, flexible and easy to grab and hold on to. Spectra rope is high strength, low stretch and stronger for pulling. Some higher end bags have a Spectra core for strength and a Poly wrap for comfort.

Bag – the bag itself is usually nylon, sometimes with a mesh section to facilitate drying. The bag should be colorful for visibility, with a large opening at the top to deploy and stuff easily, and durable enough for years of use. The bag will have a foam disk at the bottom for floatation, and a loop at both ends to attach a carabiner.

Additional paddler stabilizes the thrower
The "clean line principle" means designing a throw bag that is free of large loops and attachments that could snag on obstacles or people during a rescue. Following clean line principals makes the bag safer for throws, but less useful for pulls. If you have the room, it might be better to carry a smaller clean line bag for throwing, and a larger bag or rope for pulls.

Rescuing a swimmer with a throw bag takes practice. First you have to find the best place to perform the rescue. This should be downstream of the rapid with a clear place to stand, an unobstructed view for the throw, and a safe place for the swimmer to land.

Pin kit for a Z-drag
Before throwing get the swimmers attention by yelling “ROPE”. The throw can be underhand, overhand or side arm depending on the conditions. The throw should be timed to slightly lead the swimmer so the rope lands on their chest.

The swimmer will position the rope on the shoulder opposite the side that they are getting belayed into. Never wrap your hands around the rope. The swimmer also needs to be careful not to get wrapped up in the rope - especially around the legs.

Once the swimmer is on the rope, the thrower assumes the belaying position with the rope around their back and their feet wide for stability. For extra leverage, the thrower can sit down, or have other paddler hold on to the back of their PFD. In a dynamic belay, the thrower moves downstream to reduce the stress on the thrower and the swimmer until they reach easier water.

Attaching lines to the boat
The other principal use of the throw bag is pulling a boat out of a pin or off an obstruction. Like any other rescue skills, it’s essential that you practice this before you need it. The easiest pull is a straight pull with a static line. The rope is attached to the boat, and everyone pulls. Often this is sufficient to get the boat free.

If more power is needed, you may need to set up a Z-drag, which provides a 3:1 mechanical advantage compared to a straight pull. To set up a Z-drag you will need a pin kit with throw rope, a prusik, two carabiners, two pulleys and a sling. Here is how to set up the pull.

Step 1: Build an anchor by wrapping the sling around a sturdy tree or rock. Clip a carabiner and pulley through the sling.

Straight pull with a static line
Step 2:
Secure the bag end of your rope to the boat. Run the tail end through the anchor pulley.

Step 3: Wrap the prusik loop as far back down the rope toward the load as possible. Clip the second carabiner and pulley through the prusik.

Step 4: Run the tail end of the rope through the prusik pulley and back toward the anchor. Pull on the tail end of the rope in the same direction as the main line is pulling on the boat.

Links:
Choosing a throw bag

Monday, September 16, 2024

Incident Management at Fort Wetherill - September 15, 2024

Discussing towing in the Dumplings
I decided to attend RICKA’s Incident Management session at fort Wetherill. We regularly practice assisted rescues on trips, but this would be an opportunity to practice more advanced rescues in real conditions.

We met at 9:00 at Fort Wetherill. Seas were calm and wind was from the west as we launched. We paddled out around Bull Point to practice towing in the easy tidal current around the Dumplings. I got to try out my new tow belt with short (15-foot) and long (50-foot) tows. On my tow rope there are two carabiners to unclip - one for short tows and a second for long tows.

Demonstrating the scoop rescue
On short tows my tow belt worked fine. I towed one person by clipping on to one deck line with clip up. Clicking on to one line will allow the tow will continue even if the anchor holding the deck line releases. Clicking on from the bottom with the clip up reduces the likelihood the clip with hit something and release.

I towed two people (rafted tow) by running the tow line through one deck line of the assist boat and clipping into one line of the victim boat with the clip up. This allows the assist boat to reach the carabiner to unclip the line if needed. The short tow line works great when you need to get some quickly away from a hazard, like rocks.

Two paddlers out of the boat
The longer tow works better when you are towing for a long distance – especially in swells so you don’t get run over by the towed boat as it comes down the face of the swell. On long tows, the knot and clip in the middle of my tow line created drag and a one point snagged a clump of sea grass that made it tough to paddle. I might consider removing the second clip and daisy-chaining the rope for shorter tows.

After using the tow belt we practiced contact towing with the person being towed simply grabbing the deck lines of the rescue boat and pushing/pulling the bows/sterns together depending on which way we were going. 
We practiced pulling boats out of the rocks with tow lines and contact tows as we worked our way along the rocky coast over to Mackerel Cove.

Getting Tim back in his boat
As we rounded one headland we saw Kelly out of her boat holding her arm like she had a dislocated shoulder. Cam was able to get her back in her boat using a scoop rescue. The scoop rescue is used to float a tired or injured paddler into a partially submerged boat, which is then rolled back up, pumped out, and towed to safety with a rafted tow. 

The seas were choppier with winds from the south as we headed back out after lunch. If you spend enough time playing in rocks you will eventually come out of your boat, and Tim demonstrated swimming out of the rocks as a proactive way to get yourself to safer water. 

Reviewing the hand of god rescue
When you are in the water near the rocks, the first thing that you need to do is get yourself to a safe position the with kayak between you and the rocks. Then you can flip the boat over, attach the tow line to the boat, and aggressively swim out of the rocks, all while holding on to the paddle. Tim did fine, and once he was in calmer water Bill and Eric got him back in his boat.  

We worked our way back along the shore continuing to practice assisted deep water rescues, scoop rescues (I did an anchor tow on one), two-out-of-the-boat self-rescues using one boat as an outrigger to get the first paddle in, and hand of god rescues. 

More rescue practice
The h
and of god rescue is used to right a kayaker that can’t come out of their boat because they are unconscious or just can’t get the spay deck off. It involves a tricky combination of pushing down on the inside edge while pulling up the outside to right the boat with the paddler still in it - not easy. 

We got back to Fort Wetherill around 4:00 after a long day of practice. I learned a lot, but also realized how much I still have to learn.

View to Newport as we had back to Fort Wetherill

Wednesday, September 11, 2024

Deep Water Rescues

Swimmer out of the boat
The deep water rescue is a fundamental skill for all sea kayakers. It should be practiced until it is quick, efficient and can be done in a variety of conditions.

For the swimmer, the rescue starts with a wet exit – tuck forward, pull the grab loop to release the skirt, and push yourself out of the boat (hit the deck, pull the skirt, show the moon). Hopefully you can do all this while still holding onto your paddle. If for some reason you can’t find the grab loop, run your hands along the sides of the cockpit and release the skirt from the sides of the combing.

Rescuer empties the boat
Once out of the boat you need to keep hold of your boat and your paddle. Flip the boat over and move to the bow waiting for help, yelling “swimmer” or raising your paddle if necessary to get the rescuer’s attention. At this point the rescuer will come in to make contact with the swimmer's boat. It is usually best to come in at an angle, hook the boat with the paddle, grab the deck lines and once stable stow your paddle under the deck lines.

Once the rescuer has stable contact they need to empty the boat. The swimmer will move the rescuer’s bow or stern while the rescuer turns the swimmer's boat perpendicular, pulls the boat up on the deck and rolls it over to empty. Once the boat is empty, the rescuer needs to lift the boat slightly so the cockpit rim stays over the water as they roll it back upright. You usually only need to pull the boat up on the deck to about the front hatch.

Swimmer reenters the boat
Once the boat is empty, the rescuer will use the deck lines to move the swimmer’s boat alongside their own. It is usually best to orientate the boats bow to stern, but bow to bow is fine if that is easier. Either way the rescuer needs to hold on to the deck lines on the front deck to leave the rear deck free for the swimmer to enter.

With the boats in position, the swimmer moves into position to reenter the boat. If they still have their paddle, now is the time to pass it to the rescuer who can stow it in the deck lines or hold it across both boats to increase stability.

Swimmer back in the boat
The swimmer reenters the boat by pulling themselves up on the rear deck, reaching over to grab the deck lines on the rescuer’s boat, sliding their feet into the cockpit and scooting down into the cockpit, and rolling over to the outside of the rescuer’s boat back into the seat. You can also use a heal hook with the outside leg to roll up int the cockpit.

Once the swimmer is back in the boat, the rescuer will wait until any remaining water is pumped out, the spray skirt is attached and the swimmer has their paddle and is comfortable before releasing.

Tuesday, September 10, 2024

Rock Rescues

If you spend enough time playing in rocks you will eventually come out of the boat. How you respond depends on the conditions you are in and the availability of help.

The first order of business if you come out of your boat in the rocks is to get yourself into a safe position. You never want to be in between the rocks and the boat, so position yourself with the kayak between you and the rocks. Once you are in a safe position, you can begin to think about how to get out.

Swimming out is a proactive way to get yourself to safer water. If the distance is short, you can simply grab the boat and go. Flip the boat over, swim to the end of the boat furthest away for the rocks, grab the toggle, and aggressively swim out of the feature. You can either stow your paddle in the deck lines or hold it in your hands as you swim.

If the distance is longer, it may be easier to attach your tow line. Once again, get to the end of the boat furthest from the rocks, clip on your tow line and go. Once in calmer water you can pull in the boat, unclip and tuck the towline in your PFD to prevent it from getting tangled in the rocks, and do a self or assisted rescue.

If someone is nearby and the distance is short you can do a toggle tow. Flip your boat over, and move to the toggle at end furthest from the rocks. The rescuer paddles in and presents the bow or stern toggle for the swimmer to grab, and paddles out of the feature. Once in calmer water you can do an assisted rescue

If conditions are rough it might be better for the rescuer to use the tow line. The swimmer gets in the safe position on the rescuer’s boat while the rescuer clips the tow line on the swimmers boat and paddles out. Once in calmer water you can pull the boat to you and do an assisted rescue.

Once the rescuer has the swimmer out of the rocks, it is often helpful to have a third member of the team clip on to the rescuer’s boat for an anchor tow that prevents them from drifting back into the rocks during the rescue.

Saturday, July 6, 2024

Interview on Boating Safety on NBC 10 News

Being interviewed on the front lawn
 by Molly Levine from NBC 10 News
 
What would you say if you had 30-seconds to explain boating safety? This was my attempt in an interview with NBC 10 News after the death of two kayakers in East Providence at Omega Pond on July 4th. Omega Pond is not far from the Providence River where we paddled on July 4th.  Condolences to the families at this difficult time.


Thursday, December 14, 2023

River Knives

There was a post on P.com on attaching a river knife to your PFD. I’ve had an NRS Pilot knife on my PFD for years – once you attach the clip the lash tab it is never coming off. To be honest, I’ve never been in a situation where I needed to use it for anything other than spreading peanut butter. The blade definitely rusts over time. When it gets too rusty I buy a new knife (cheap, so maybe you get what you pay for). They hadn’t changed the design in years, so the new knife still fit in the old clip. I knife I have is now in close-out, so I just bought one last knife

NRS Pilot River Knife
I never thought to actually try to cut rope with this knife until I saw this video. Just like in the video, it took 5-6 swipes to get through an old safety rope. I think the little cutting hook at the base of the blade made it harder to get through the rope. I had better luck with just the serrated section of the blade. On the newer version that hook is a lot smaller.

Just for kicks, I dug out my father’s old river knife – turns out it’s a Gerber Blackie Collins River Master. There are different versions of this knife, and all are rare and collectible. This is the version that I have. 

Gerber Blackie Collins
River Master Knife
With a longer blade and better serrations it usually cut through the rope on the first or second swipe. Leave it to my father – he always bought the good stuff. I’ve never used it as a river knife. It’s been in my kitchen kit for years. It still has a sharp factory edge, so I guess I’ll keep it there.

Monday, July 31, 2023

Lightning Safety

In the United States, an average of 66 people are killed each year by lightning. Especially for paddlers who spend a lot of time outside, lightning is a serious threat, and everyone needs to understand the risks, and know how to protect themselves.

Know the Weather Forecast

Modern weather forecasting is extremely accurate, so be sure to check the forecast before paddling. If the forecast calls for some chance of thunderstorms, cancel or postpone your trip and go another day – better safe than sorry.

Watch for Developing Thunderstorms

Even on the water it is a good idea to watch for storms. Thunderstorms are most likely to develop on warm summer days and go through several stages of growth, development and dissipation. On a sunny day, as the sun heats the air, pockets of warmer air start to rise in the atmosphere. When this air reaches a certain level in the atmosphere, cumulus clouds start to form. Continued heating can cause these clouds to grow vertically upward in the atmosphere into "towering cumulus" clouds. These towering cumulus may be one of the first indications of a developing thunderstorm.

Approaching Thunderstorms: When to Seek Shelter

If you can hear thunder, you are within striking distance of lightning, and should seek shelter immediately! The first stroke of lightning is just as deadly as the last. If the sky looks threatening, take shelter before hearing thunder. You can get struck by a storm that’s up to 10 miles away.

The 30-30 Rule

Use the 30-30 rule where visibility is good and there is nothing obstructing your view of the thunderstorm. When you see lightning, count the time until you hear thunder. If that time is 30 seconds or less, the thunderstorm is within 6 miles of you, and is extremely dangerous!

The threat of lightning continues for much longer than most people realize. Take shelter as soon as you hear thunder, and wait at least 30 minutes after the last clap of thunder before leaving. Don't be fooled by sunshine or blue sky!

Outdoor Activities: Minimize the Risk of Being Struck

During a thunderstorm, each flash of cloud-to-ground lightning is a potential killer. In addition to the visible flash that travels through the air, the current associated with the lightning discharge travels along the ground. Although some victims are struck directly by the main lightning bolt, many more victims are struck as the current moves in and along the ground.

There is no safe place outside in a thunderstorm. The only way to significantly reduce your risk is to get inside a substantial building or automobile as fast as you can. If you are stuck outside in a thunderstorm, you should avoid the following:
  • Open areas including water – you don’t want to be the tallest object in the area.
  • Hills, isolated trees, towers or utility poles - lightning tends to strike these taller objects.
  • Metal conductors such as wires or fences - metal does not attract lightning, but lightning can travel for long distances through it.
If you are on the water you should get off the water at the first sight of lightning or sound of thunder. Avoid rocks and look for lower ground under uniform tree cover away from the water. Exposed sheds, picnic shelters, tents or covered porches do NOT protect you from lightning. Do not assume the storm is over until you haven’t heard thunder for about 30 minutes.

Crouching Can Help—But Lying Down Makes Things Worse

If you find yourself in a situation where you are exposed to the elements with nowhere to shelter, make yourself as small a target as possible. Crouch down with your feet together, hands on knees and your head tucked in. Don’t lay down on the ground. You want as little of yourself in contact with the ground as possible.

Be Prepared

Check the forecast, and cancel or postpone your trip if lightning is a threat. In the event of a storm, fully enclosed buildings with wiring and plumbing provide the best protection. If a sturdy building is not available, get into a car and close all the windows. Stay inside for 30 minutes after the last rumble of thunder.

Links:

Sunday, April 30, 2023

River Rescue Clinic with Boston AMC – April 29, 2023

The crew get ready
I was looking through the AMC Activities, and saw that Conrad was coordinating a river rescue clinic for Boston AMC leaders at Zoar Outdoors. I signed up, but thought I would probably get bumped out by another leader. Fortunately, I didn’t.

I took my first swiftwater rescue class with the Blackstone Valley Paddled Club back around 2007. That class was also at Zoar Outdoor and focused on basic rescue skills such as safe and aggressive swimming, throw rope rescues and wading rescues. Shortly after that, I took a more advanced swiftwater course with the NHAMC that also covered strainers, rescue vests and rope-based rescues. Since it has been a while since I’ve had a refresher course, I was glad to get into this one.

Hand of God Rescue
This session focused on boat-based rescues with a minimum of equipment. With kayakers, this is the way most rescues happen these days. The session started with a discussion of trip safety, and what leaders should think about when planning and running a trip. 

After the classroom session we headed out to the river to review boat-based rescues including the “T” Rescue, Parallel/Side-by-Side Rescue, and the Hand of God Rescue. We also practiced emptying swamped boats and deep water recoveries. As a canoeist, its good to know that a Side-by-Side Rescue will work with a kayaker expecting a "T" Rescue.  Also good to know the best way to empty a swamped kayak. Those are skills I can use on the river.

Waiting for the next swim on Turtle Rock
After lunch we headed over to the Baby Gap (below Zoar Gap) to practice swimming and rescuing swimmers. We practiced swiftwater entries, safe/passive swimming, and aggressive swimming. 
We also practiced throw rope rescues, towing swimmers and a vectored Live Bait rescue.

Before packing up, we took a moment to remember Jocelyn Barrett, a frequent Deerfield paddler and active member of the community who passed away last week. It was a long, cold day, but definitely worth the time.  Glad I was able to participate.


Swimming below Zoar Gap from Erik Eckilson on Vimeo.

Links:

Tuesday, March 7, 2023

My New Drysuit Is In

New drysuit on the Hunt River
I was getting dressed for a Tville run a couple of weeks ago and I ripped a hole in the latex bootie of my drysuit. To be honest, I’ve put on a few pounds and added a few inches around the waist over the past couple of years, so my old drysuit was getting tight anyway. I took this as an opportunity to buy a drysuit that is the next size up - more baggy than tight.

In the past I have always bought the NRS Extreme, but they only had the fire department rescue version in my size, so I decided to spend a couple of extra bucks and go for the Kokatat Legacy instead. Everyone always raves about Kokatat quality, so we’ll see. I forgot how tight the gaskets are when they are new. I can deal with it around my neck, but I had a hard time getting off over my head, so I decided to trim it.

I used a razor blade on a 4" can of ice tea. I found the more I stretched the gasket the harder it was to see the rings. Maybe just my bad eyes, but the 4" can worked fine - just tight enough that it stayed in place. I took one ring off to start - it was still really tight, rolled over on top of itself, and I still had a hard time getting back over my head. So I took off a second ring an it seemed just about right - tight enough to allow for some stretching with use but it lies flat and I can get it back over my head without too much of a struggle. 

Its funny that NRS seems to be the only manufacturer/retailer that says not to trim. I’ve always had NRS drysuits and I never had to trim them. Don’t remember them being particularly tight when they were new. This Kokatat had to be trimmed - I couldn’t have worn it the way it was. To quote Spirtboat on P-net - trim fearlessly! I have since fixed the bootie in my NRS Extreme, so I now have a sprare.

Thursday, December 22, 2022

Cold Water Paddling

Winter is upon us, and for those of us who are year-round boaters, it is time for a reminder on the dangers of cold water paddling, and how to minimize your risk.

How cold is cold water?

"Cold water" is probably not a cold as you think. The American Canoe Association sets its thermal protection threshold at 60 degrees. For us in southern New England, water temperatures generally don’t hit 60 degrees until sometime in June, and remain above that threshold until sometime in October. That means anyone paddling from November to May is paddling in cold water conditions.

Water Temperature in Narragansett Bay
During the "off season", the water in southern New England can be very cold. Narragansett Bay reaches its coldest temperature (high 30’s to low 40’s) in late February/early March. While air temperatures increase quicky through the spring and early summer, water temperatures increase more gradually. The opposite is true in the fall when air temperatures drop quicker than water temperatures. Area rivers follow a similar pattern, but generally get 5 to 10 degrees colder in winter, and 5 to 10 degrees warmer in summer.

Why do we need to be concerned about cold water paddling?

There are three major risks resulting from cold water immersion - cold shock, physical incapacitation and hypothermia – and all three greatly increase the risk of drowning.

Cold shock comes first. It can happen the moment you hit cold water. Cold shock can cause a loss of breathing control often referred to as the “gasp reflex”. This is especially dangerous in rough water conditions where the ability to coordinate your breathing with wave splash is required.

Physical incapacitation comes next. Immersion in cold water causes your muscles and nerves to cool to the point that they simply stop working. In frigid water without protection you can lose the ability to use your hands in a matter of minutes, and the ability to use your arms and legs shortly thereafter, making a self-rescue or even an assisted rescue more difficult.

Hypothermia comes next. Hypothermia results from a drop in your core body temperature. To compensate, blood flow shifts from your extremities to the vital organs in your body core. This will eventually result in confusion and disorientation that can rob you of the ability to make sound judgments about your safety.

So how can you protect yourself if you are paddling in cold water?

Cold water immersion is a race against the clock, and for those who are not prepared, it can be a desperate race. When paddling in cold water conditions please remember:

Always, always, always wear your PFD

By keeping you floating at the surface, a PFD can reduce (but not eliminate) the risk of sudden drowning due to cold shock or physical incapacitation. Make sure that your PFD is properly sized and adjusted so it doesn’t rise up around your ears or slip off entirely.

Never paddle alone - three boats are recommended for safety

Physical incapacitation and mental disorientation are inevitable with cold water immersion, potentially making self-rescue impossible and assisted rescue more difficult. Paddling with a strong and knowledgeable group will increase your likelihood of getting back in your boat.

Keep the trip short, and well within the paddling ability of the group

We all like to push our abilities, but save long trips in difficult conditions for the warm water season. Don’t push the envelope in cold water conditions.

Dress for immersion in a wetsuit or drysuit

Beginners often make the mistake of under-dressing when the air is warm, but the water is cold. Since you can never rule out an unexpected swim, you should always dress for the water, not the air. Water is approximately 25 times more efficient than air at drawing heat away from your body, so you need protective gear like a wetsuit or drysuit to prevent excessive heat loss.

Layering for Paddlers

Boaters, like other outdoor adventurers, are wise to adopt a layering system for thermal protection. Layers allow you to add and remove pieces to match changing conditions, and help your body maintain a safe, comfortable temperature. These layers fall generally into three categories: base layers, insulating layers and outer layers.

Base Layers

Start with a moisture-wicking base layer next to the skin. Synthetic fabrics such as nylon, polyester and polypropylene work well since they don’t absorb water and move moisture from your skin. Stay away from cotton - it absorbs water, dries slowly and loses its insulating value when wet.

Insulating Layers

Insulating layers provide the thermal protection that allow you to remain warm, calm, and able to function while you’re in the water. Fabric based insulating layers hold in your body’s heat, but need to be kept dry under protective outer layers. Theses insulating fabrics include fleece, wool, and other insulating, non-absorbing materials. You can use multiple thin layers to adjust to a variety of conditions.

Neoprene is an insulating layer that will work well even when wet. Neoprene rubber contains thousands of tiny gas bubbles that slow down heat transfer. Neoprene “wetsuits” come in a variety of styles including “shorties”, "Farmer Johns" and separate shirts, jackets and pants. 
Farmer Johns (sleeveless wetsuits with full-length legs) are the most popular for paddlers since they protect the core and provide good freedom of movement, but they will need to be supplemented with additional layers in the coldest water. Wetsuits must fit tight to minimize the influx of cold water, and must be thick enough to provide appropriate insulation.

Outer Layers

Windproof and waterproof outer garments round out your cold water protection. An outer layer made with a material featuring a breathable coating or membrane is definitely preferable. This allows perspiration moisture to pass out of the garment, keeping the inner layers drier, and significantly increasing your comfort.

Splash wear is simply a waterproof outer layer that is designed to keep your under layers dry if you get splashed or rained on. If you’re using neoprene as your insulating layer, wearing a waterproof garment over it will cut down on evaporative cooling from the wet outer fabric of the wetsuit. If you go for a swim in splash wear, your inner layers will get wet.

Semi-dry wear is the next step in protection. These garments use neoprene gaskets, or a combination of neoprene and latex gaskets, to block water entry. Neoprene gaskets aren’t as efficient at keeping water out as latex, but they’re more comfortable and less expensive.

Drywear is the safest option for cold water paddling These garments use latex gaskets and booties to block water entry. This totally dry system allows you to customize your comfort and protection level by adjusting your insulating layers to match weather and water conditions.

Protect your extremities with a hat, neoprene gloves and warm footwear

Your mom always told you to wear a hat when it’s cold outside, because much of your heat escapes from your head. The same is true when paddling. If you are wearing a helmet, a helmet liner is a good investment. When it’s really cold, a neoprene balaclava is warmer than a helmet liner, and provides extra protection around the neck and face.

To keep your hands warm you have two main options: neoprene pogies or gloves. Neoprene gloves protect your fingers, but can hold water and reduce your grip on the paddle shaft. Pogies, on the other hand, don’t hold heat quite as well but drain easily and allow direct contact between your hand and the paddle. Try them both, or in combination to see what works best for you.

Neoprene boots are the preferred footwear when the water is cold. A wide variety of boots are available, most of which come with rubber soles to provide grip and protection when you walk on rocks.

Test your gear in real conditions

How will you know if you have the right gear and can function in cold water? Take a plunge to try it out. Do this in safe conditions with buddies nearby just in case. Testing will confirm that you can use your gear smoothly and effectively - even when you're under stress in cold water.

Don’t fall for excuses

There are lots of excuses from folks who don’t want to be bothered preparing for cold water paddling. Excuses like:
  • I’m not going to capsize.
  • The gear is too expensive.
  • I brought extra clothing and warm drinks.
  • I’ll paddle “close to shore” or in “protected waters”.
  • I won’t encounter “challenging conditions".
  • I paddle with a group and can quickly get back in my boat.
  • It’s not that cold and I don’t want to overheat.
  • It’s just a quick trip.
In cold water, it is not an exaggeration to say that excuses can kill you. Paddle safe, paddle smart and always prepare for the conditions.


Links:

Saturday, December 17, 2022

What I Learned Running the Shuttle

The shuttle is a fundamental part of paddling. It often includes piles of boats on roofs, paddlers jammed inside cars, and “hero tales" – epic stories of great runs and even greater wipe-outs of the past. More importantly, though, the shuttle is your first opportunity to meet the paddlers who will become your teammates for the rest of the trip.

Like many other types of outdoor adventures, most paddling trips follow the common adventure model. Under the common adventure model, the group works together as a team to get everyone safely through the trip. Implicit in this arrangement is that everyone will self-select – only joining trips where they have the skills and equipment necessary to successfully complete the run.

Those shuttle stories have two purposes. Not only are they entertaining, they are also the first opportunity for group to take stock – is everyone up to the task, and do we have the skills that we need given the group that has assembled. 

Paddling is both an individual and a group sport - individual since everyone does the trip in their own boat, but group since we travel as a team, waiting for each member to complete challenging features before moving on. 

Often the best paddlers were the quietest on the shuttle – they let their paddling speak for itself. Paddling with someone in over their head can be a frustrating and perhaps dangerous experience, but once on the water we are all in it together. If you are paddling a trip at the edge of your skill level, it's best to let other members of the team know about it early so the group can plan according.

So don’t be shy – tell your story. The shuttle is an opportunity for you to meet your fellow paddlers, and for the group to start planning the trip. Besides, it's fun to listen to those “hero tales”.

Saturday, April 2, 2022

Why we do this - the three types of fun

I was half way through a 3-hour drive up to the Ammonoosuc River when a story came on the radio (NPR) about the three types of “fun”. My wife often asks me why I do these trips, and I’ve never really had a good answer other than its “fun”. It all made sense as I listened to this story because not all “fun” is created equal.
  • Type 1 Fun is enjoyable while it’s happening - the sun is out, the water is warm, the scenery is great and the company is awesome. It is ”fun” the entire time you’re doing it. Like everyone else, I do plenty of these trips.
  • Type 2 Fun on the other hand might not be “fun” while it is happening, but it is “fun” in retrospect. The 3-hour drive up to the Ammonoosuc was not “fun”. Putting up with cold weather and cold water was not “fun”. The anxiety of running a new river with a new group of people was not “fun”. In retrospect though, it was a BLAST, and I would do it again in a minute. Type 2 Fun tends to get us out of our comfort zone. We push a little harder, but hopefully we are rewarded with improved skills and great memories.
  • Type 3 Fun is not “fun” at all – not even in retrospect. Afterward, you think “What was I doing?” and “I’ll never do that that again!”. It is what happens when you get too ambitious and too far out in front of your skills.
The Three Types of Fun is a concept that seems to come out of the hiking/climbing community, but it certainly applies to paddling. I realized after listening to the story that a lot of the whitewater and camping trips that I like to do are Type 2 Fun. Fortunately, I’ve never had a trip turn into Type 3 Fun - as least not yet. 

Friday, January 10, 2020

Personal Risk Management for Paddlers

Why do we paddle? For some it is the peace of a quiet day on the water. For others it is the thrill of running a wild river, or riding a crashing wave. Whatever your motivation, there is no doubt that paddling involves risk, and understanding these risks can help us become better paddlers. 

Putting Risk in Perspective

In life, risk is unavoidable. Looking at the risks that we face over our lifetime we find that chronic disease is by far the most common cause of premature death. Fortunately, most of us can expect to live long and active lives, and the most important thing that we can do to manage this risk is eat right, exercise and maintain a healthy life style - in other words, get out there and paddle!

In terms of accidental death, riding in a car is statistically the riskiest thing that we do every day. We are much more likely to be involved in a car accident riding to/from the put-in than we are to be involved a boating accident. Boating accidents are rare, and paddle sport accidents involving experienced paddlers are almost nonexistent – almost!

While paddle sport accidents are rare they do occur. The American Whitewater Accident Database catalogs over 1,600 fatalities and close calls on whitewater rivers dating back to 1972. Lest the sea kayaker community feel left out, there is also the case of Douglas Tompkins, a noted conservationist and the founder of the North Face and Esprit clothing brands, who died in a kayaking accident in the Patagonia region of southern Chile in 2015. 

Risks, Hazards and Risk Reduction Strategies

We need to understand a couple of definitions as we begin to look at risk management for paddlers – Risks, Hazards and Risk Reduction Strategies. 

“Risks” are things that can go wrong when we paddle. They can be things that happen to the paddler (drowning, hyperthermia, blunt trauma, lacerations, exhaustion, dehydration), to the paddler's equipment, or can be situational like getting lost. 

“Hazards” are conditions that increase a risk. Hazards can be related to human factors (skills, equipment or physical condition), environmental factors (weather, tides, water levels or physical obstructions like rock, ledges, strainers, or shoreline access); or can be situational (planning, navigation or leadership).  


For example, cold water paddling is a hazard that increases the risk of hypothermia. Risks and hazards don't operation in isolation. They often build upon themselves making the situation more dangerous. 

“Risk reduction strategies” are ways to reduce a risk, or eliminate it entirely. Risky situations have a way of progressing from routine events to serious accidents.


Risk mitigation strategies attempt to break the chain that leads to serious accidents - like wearing a drysuit or wetsuit in cold-water conditions. Other risk mitigation strategies include wearing a PDF (always), having appropriate skills and equipment for the trip, and paddling in group with appropriate skill levels. The ultimate risk mitigation strategy is avoidance - like knowing when to change or cancel a trip. While avoidance is an important strategy for dealing with the most dangerous risks, it is not a strategy that can be applied in all situations, or we would never paddle at all.

Real vs. Absolute Risk

A risk at its most dangerous level is called the “absolute risk”. Through risk reduction strategies we can reduce the level of risk to a more manageable level, which is called the “real risk”. In most cases, a paddler’s objective is not to eliminate risk entirely, but to use risk reduction strategies to match the real risk to that paddler’s experience and skill level.


Real vs. Perceived Risk

Difficulties can arise when a paddler’s subjective assessment of risk does not match the real risk. This is especially true if the paddler’s “perceived risk” is significantly less than the real risk, putting the paddler in danger of physical harm. This is a frequent cause of accidents with inexperienced paddlers. At the other end of the spectrum, if a paddler’s perceived risk is significantly higher the real risk, that paddler may be avoiding situations that are within their skill level, and that they would find fun and rewarding to paddle.


Accurately matching the real and perceived risk is a skill that comes with experience. There are number of factors that might affect our perception of risk at any given time including our confidence level, enthusiasm (get-moreitis), experience with the trip or similar trips (familiarization), training, physical condition (tired, hungry, etc.) and group dynamics (peer pressure and risk shifting). It is important to understand how these biases effect our evaluation of risk. 

How Much Risk Is Acceptable

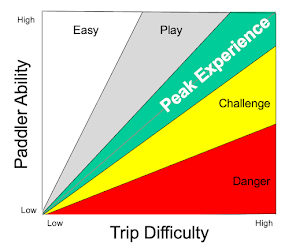
Determining the amount of risk that we wish to take is a very personal decision. Some paddlers prefer easy trips that barely challenge their capabilities. Other paddlers prefer to push the extreme, always paddling at the edge of their ability. For most of us, our “peak experience” lies somewhere in between – just enough to provide a challenge, but not enough to put us in danger.


Personally, I enjoy a mix of trips – some easy, some more challenging. I also think it is important to occasionally push the envelope with more challenging trips as a way to improve my paddling skills. While this opens the door to new and interesting trips with new and interesting people, I also recognize that it must be done with an eye toward safety. Even trips that we know well can change, and conditions must be constantly assessed and managed.

Managing Risk

The ongoing process of assessing and managing risk is called the “risk management process”. This process is often taught in outdoor leadership programs as a way to manage group risk, but is also useful for individual paddlers as they decide whether to participate in a particular trip. The process includes identifying the trip, evaluating the risks and hazards, assessing risk mitigation strategies, and then (and only then) determining whether to participate in the trip.


The process starts with an identification of the trip - what are the conditions I will face, who is in the group I will paddle with, and how do these factors match with my experience, skills and equipment. If the risks are acceptable I will participate in the trip. If not, are there additional risk mitigation steps that I can take to reduce my risk to an acceptable level - will the leader show me the easy lines, or can I walk the more difficult rapids. Only when these modifications are in place should I agree to participate in the trip.  

While this assessment should always take place at the start of a trip, it shouldn’t stop there. Everyone needs to be aware of changing conditions and make adjustments accordingly.

What about Trip Leaders?

Of course, most of us don't paddle alone. While the notion of a "trip leader" is antithetical to some paddlers, having someone planning and thinking about risk management issues in advance is important for the group. 

How leadership responsibility gets distributed in the group depends a lot on the group. Leadership can be hierarchical with responsibility residing in a single individual, shared with everyone sharing responsibility, or something in-between.  


The most oblivious example of a hierarchical structure is the military with its formal chin of command. This is a structure that everyone understands, and typically happens on guided trips.

At the other end of the spectrum is the shared structure where everyone is involved in leadership. When friends get together for trips this is often the structure they adapt. It works best with folks who know each other well and are willing to move from leader to follower depending on the situation and the skills needed. 

Many trips fall somewhere in-between in a delegated/designated structure with an a formal or informal "trip leader" working with other members of the group to make sure that critical tasks are covered. Most club trips are structured this way.

Its all about Personal Responsibility!

Like everything in life, paddling is a sport that involves risk. While these risks can be managed, short of staying home they cannot be completely avoided, and each paddler must be responsible for their own safety. Paddle safe, paddle smart, and always wear your PFD!


Based on Managing Risks in Outdoor Activities (Outdoor Safety, Mountain Safety Manual 27) – 1993 by Cathye Haddock (Author), New Zealand Mountain Safety Council (Author), Pippa Wisheart (Editor)

Thursday, February 23, 2017

Does walking make you less of a paddler?

Last weekend, I was sitting down on the rocks in the middle of Zoar Gap taking pictures. The rest of the group had just paddled through, and now it was my turn. I could have easily slipped my boat back into the water, pealed out into the current, and attempted to hug the right line through the Gap as I have so many times before. Instead, I decided to walk my boat, and I’ve felt guilty about it ever since. 

I know that my guilt was entirely self-imposed - no one in the group said a word, or even seemed to care. Still, it brings up a question that I know I struggle with on occasion – does walking make you less of a paddler? 

In some ways it definitely does. There is a lot of truth to the old adage “if you aren’t swimming, you aren’t trying hard enough”. To become a better paddler you definitely have to push yourself to take risks, and if walking becomes a crutch, then that’s a problem. Based on the number of swims that I have taken over the past few years, I’m not worried about that yet.

But does that mean that you need to run every rapid? Stretching your abilities is one thing, but I also try to temper that with the desire to be self-sufficient. I joke with another paddling friend that we are class II paddlers with class IV self-rescue skills. It’s nice to know that the group is there to support us, but it’s always better if they don’t have to.

So I have come to the conclusion that occasionally it is OK not to run a rapid. Paddling is not about a single event. It’s about running the river, and getting home that night to run another river another day. It’s about pushing your abilities, but not putting yourself or others at unreasonable risk. It’s about enjoying a day on the water with a great group of people. So if my ego gets bruised occasionally, either by swimming or by walking, I’m OK with that.

So to all my paddling friends, here's the deal - if I’m tired, if I’m cold, if my gut is telling me that today is not the day to run that rapid, I might walk. But if I don't, thanks in advance for fishing me out when I swim.
Zoar Gap - that's me sitting on the rock on the left