Sunday, December 31, 2023

2023 Year End Review

Stokers on the Scantic
The year started with a New Year’s Day trip on the Providence River, and ended with a New Year's Eve camping trip at Burlingame. In between, it was another great year for paddling.

My whitewater season started in February, and I got out on a lot of old favorites including Tville (1, 2), the Upper Millers (1, 2), Otter Brook, Knightville, Housatonic, Lower Deerfield, Pemi-Bristol, the Piscat, the Took and Crystal. I ran the Scantic Spring Splash whitewater race and was able to get into the swiftwater rescue class with the Boston AMC at Zoar Outdoors.

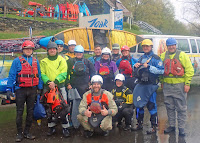
Swiftwater training with Boston AMC
I paddled my sea kayak almost every day of my summer vacation, but only got it out for a couple of other trips. I did the Providence River (1, 2), Point Judith Pond and the Seekonk River with the Flatwater group, and Potter Cove with the Sea Kayak group. I also took the advanced stokes class at the Kayak Centre.

I led one Blackstone Valley Paddle Club trip - Rice City Pond, and three RICKA Flatwater trips – Providence, Point Judith Pond and the Lower Deerfield. I also coordinated the RICKA Flatwater Training

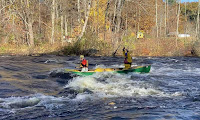
Piscat surfing
I did 51 trips which is 3 less than my 12 year average of 54 trips. I had three swims on three consecutive trips – ScanticBranch, and the Upper Millers. I did one poling trip on the Ware River

Here are some of my more significant trips:
Here is the video of some of my favorite trips.


Favorite Trips of 2023 from Erik Eckilson on Vimeo.

I paddled almost every day of my summer vacation on Great Island including a RICKA trip on Point Judith Pond.


South County Vacation 2023 from Erik Eckilson on Vimeo

I did get out for a spring camping trip at Burlingame, and a fall Allagash trip with Jonathan, Conrad and Bob. 


Allagash Camping 2023 from Erik Eckilson on Vimeo

The year ended with a winter camping trip at Burlingame on New Year's Eve.

Moose Hill hikers
Not sure why, but I didn’t do quite as much hiking this year:
In terms of resolutions from last year, I did pretty well. I did take a training class in my sea kayak, I did a camping trip on the Allagash, and paddled quite a bit of whitewater. Unfortunately, I didn’t get my sea kayak out in rough water conditions, and I didn't make it back to the Dead.

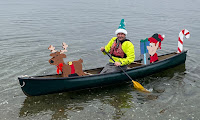
Tandem paddling on the Took
In terms of resolutions for 2024, they are just like 2023.
  • Keep practicing with my new sea kayak – especially in rough water conditions.
  • Keep camping – maybe the St. John, or the Allagash again. I’d still like to do a summer trip on the St. Croix, or the Maine Island Trail in my kayak.
  • Keep paddling whitewater as long as my knee holds up.
  • Get back to the Dead – always a great trip.
  • Practice rolling – I’ll keep including it until I do it – maybe in the sea kayak.
I won't be paddling on New Year's Day, but there are plenty of rivers to paddle, plenty of trails to hike, and plenty of places to go camping in 2024 - looking forward to it. Happy New Year everyone.

End-of-Year Camping at the Burlingame Canoe Campsites - December 30-31, 2023

Heading out from Bradford Landing
We’ve been having a relatively warm winter, so I was hoping to get one more camping trip in before the end of the year. Without too much arm-twisting we got a group of 5 together for an overnight trip at the Burlingame Canoe Campsites – me, Bob, Dan, John and Chuck.

The weather forecast was mixed with slight chance showers Saturday afternoon, day-time temperatures in the 40’s, and night-time temperatures dropping into the 20’s. I met the group at the Bradford Landing at 11:30 for the 3-mile trip up to Burlingame. With several inches of rain over the past two-weeks, the river was high and it was a bit of a slog paddling up to the campsites.

Camp set up in the field
We are fortunate to have a several very nice campsites on the Pawcatuck River. There is Stoney Point on Worden Pond, the Carolina Canoe Campsite just upstream from the Richmond Landing, the "bootleg" site at the confluence of the Wood River downstream from Alton Landing, and of course, the Burlingame Canoe Campsites upstream from Bradford Landing in the Burlingame Management Area.

The Burlingame Wildlife Management Area extends north from Watchaug Pond in the Burlingame State Park to include a large woodland along the Pawcatuck River. The land is managed for both wildlife protection and recreation with hunting, trails for hikers and mountain bikers, and the Burlingame Canoe Campsites. These campsites are only accessible from the river or by hiking in from the parking lot on Buckeye Brook Road or from the North South Trailhead on Burdickville Road. 

Baking biscuits in Bob's Camper Kitchen
At the Burlingame Canoe Campsites there is an open field and five wooded sites. We decided to camp in the field. We hauled our gear up from the river and set up camp. The tents went up first, then the rain fly, then the kitchen. We got a short rain shower after everything was set up, but we stayed dry under the tarp while we enjoyed John’s chili for lunch

After lunch we took a walk to check out the other campsites before lighting the campfire. Dan cooked nachos in his reflector oven for an afternoon snack, quesedillas in his Big Daddy Skillet as an appetizer, and Tuscan White Bean Stew with grilled garlic bread for dinner. Desert was Strawberry Shortcake with Bob’s homemade Bakewell Cream biscuits baked in his Camper’s Cook All Camper Kitchen baking pan.

Dan cooking breakfast
The sky eventually cleared, and we got a great view of the night stars as we sat around the fire. After many tall-tales and war-stories we finally turned in for the night at around 10:00. I was snug and warm with my father’s winter camping gear -  a Eureka Expedition tent and Sumberjack Quallofil sleeping bag. Compared to today’s gear, both are big and bulky, but they still work great – no complaints from me.

Before I knew it I heard someone moving around outside. It was Dan getting the morning fire started. It was 6:30 and still dark, but I reluctantly climbed out of my sleeping bag to join him. After warming up by the fire, I got the coffee perking and fired up my Dutch oven to make a batch of my grandmother’s cinnamon rolls. Dan cooked bacon and home fries in his 20” Big Daddy Skillet on the fire, and I cooked omelets on the stove. John said this trip was all about the food, and he was right - we didn't go hungry.

Exploring the marsh along Poquiant Brook
After breakfast we packed up camp for the trip back to Bradford Landing. Dan had his drysuit on, so he did a New Year's Polar Plunge off the rope swing before we left. With the high water, we were able to take a detour to explore the marshland along Poquiant Brook, which flows from Watchaug Pond in the Burlingame State Park to the Pawcatuck River. Great trip and a nice way to end the year. 


Link:

Dutch Oven Cooking

For many, cooking is one of the pleasures of hanging out in camp – especially with a large group. Having a Dutch oven is like bringing your kitchen along. You can create virtually any food in camp that you can make at home.

The Dutch oven is a heavy, flat-bottomed kettle with a lid, legs, and wire handle. Traditional Dutch ovens are made of thick cast iron which absorbs heat, retains it, and distributes it evenly over the inside surface. It was designed to cook complete one-pot meals over an open fire. The legs allow you to set the pot over coals, and the lid allows you to add coals to the top for even, all-around heat.

You probably won't be see a Dutch oven on a backpacking trip, but for canoe/kayak camping you’ll be glad you brought one along. Here are a few of my favorite recipes.

Henry making Dump Cake
Henry’s Blueberry “Dump Cake”


Two cans of blueberry pie filling
One box of white or yellow cake mix
One can of lemon/lime soda

This was the first recipe that I tried in my Dutch oven, and one of the easiest. Line the Dutch oven with foil and spray with cooking spray. Add the two cans of pie filling into the bottom of the Dutch oven. Next, sprinkle the cake mix over the pie filling in an even layer. Finally, pour the lemon/lime soda over the cake mix. At this point you have a decision to make – to stir or not to stir. If you stir the soda into the cake mix, your dump cake will cook with the consistency of a cake. If you don’t stir, it will cook with the consistency of a cobbler. Set the Dutch oven over coals or charcoal with 1/3 of the coals below, and 2/3 of the coals on the lid (most of the heat should be on the lid). Cook for around 30 minutes turning frequently to prevent hot spots. You can experiment with different canned or fresh fruits.

Blueberry Breakfast Bake


1-cup milk
4 eggs
1/4-cup sour cream
1/2-cup sugar
1/4-teaspoon cinnamon
1/4-teaspoon vanilla
1-cup fresh blueberries
8 slices of bread
Mable syrup - optional

Line the Dutch oven with foil and spray with cooking spray. Mix the milk, eggs, sour cream, sugar, cinnamon, and vanilla together and store in a sealable travel container. This can be kept in your cooler until your ready to make breakfast. Cut the bread into cubes and place in the Dutch oven with the fresh blueberries. Pour the milk/egg mixture over the top and mix until the bread and blueberries are coated. Set the Dutch oven over coals or charcoal with 1/3 of the coals below, and 2/3 of the coals on the lid (most of the heat should be on the lid). Cook for around 30 minutes, turning frequently to prevent hot spots. This breakfast is nice and sweet on its own, but I like it with a little maple syrup on top. You can replace the blueberries with other fresh or frozen fruit.

Frittata for breakfast
Potato and Cheese Frittata (with whatever else you want to add)

1 package frozen home fries
6-8 eggs
2 cups cheese (pick your favorite)
Other fillings can include chopped onions, peppers, mushrooms, ham, bacon or sausage

Line the Dutch oven with foil and spray with cooking spray. In separate pan, cook frozen home fries until browned and add to the bottom of the Dutch oven. Saute other fillings and add to the Dutch oven. Sprinkle with 3/4 of the cheese. Whisk the eggs and add to the Dutch oven, swirling to make sure it is even distributed. Top with remaining cheese. Set the Dutch oven over coals or charcoal with 1/3 of the coals below, and 2/3 of the coals on the lid (most of the heat should be on the lid). Cook for around 30 minutes, turning frequently to prevent hot spots.

Lasagna

1 package no-boil lasagna noodles
15 oz ricotta cheese
1 egg
1/4 cup grated parmesan cheese
4 cups mozzarella cheese
28 oz jar of sauce (a little more is better)
Other fillings can include chopped onions, chopped peppers, chopped mushrooms, ground beef or chopped Italian sausage

Mix the ricotta cheese, egg, and parmesan cheese together and set aside (you can do this in advance and store in your cooler in a zip-lock plastic bag). In a separate pan saute the other fillings (you can also do this in advance and store in a plastic zip-lock bag in your cooler). Line the Dutch oven with foil and spray with cooking spray. Add a small amount of sauce to the bottom of the Dutch oven - enough to coat. Break the lasagna noodles to form a single layer in the Dutch oven (it doesn't have to be perfect, the noodles will expand as they cook). Layer half the ricotta cheese mixture, half the fillings, a third of the mozzarella cheese and a third of the sauce. Repeat for a second layer. Top with a last layer of noodles and the remaining sauce and cheese. Set the Dutch oven over coals or charcoal with 1/3 of the coals below, and 2/3 of the coals on the lid (most of the heat should be on the lid). Cook for around an hour, turning frequently to prevent hot spots. You may need to add more coals if it loses heat.
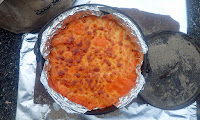
Baked Ziti

16 oz box of ziti
4 cups water
28 oz jar of sauce
8 oz ricotta cheese
1/4 cup grated parmesan cheese (if you have it)
2 cups (one package) grated mozzarella cheese
Other fillings can include chopped onions, chopped peppers, chopped mushrooms, ground beef or chopped Italian sausage

Mix the water, sauce, ricotta and parmesan cheese together and set aside (you can do this in advance and store in your cooler in a sealable travel container). Place the Dutch oven in the coals and sauté the fillings (you can also do this in advance and store in a plastic zip-lock bag in your cooler). Add the liquid mixture and bring to a low boil. Add the uncooked ziti and cook, stirring frequently until the pasta is cooked and the liquid has been absorbed. Remove Dutch oven from the coals and top with mozzarella cheese. Place the cover and coals on the top and bake until cheese is melted and golden brown.

Cinnamon Rolls
Yeast Breads – Cinnamon Rolls


The easiest way to make yeast breads in camp is to make the dough in advance (night for cinnamon rolls and morning for dinner rolls) and let the dough do its first rise in the cooler. When you are ready to bake, take out the dough that you need, shape and let it do its second rise, and bake. Here is my grandmother’s recipe for cinnamon rolls.

For dough:
1 package dry active yeast
4 cups flour
¾ cup of sugar
1 cup milk
One stick butter
Dash of salt
2 large eggs

The rolls are ready
In a bowl, mix flour with yeast. Warm milk, butter, salt and sugar in pan until butter is melted and sugar dissolved. In separate bowl whisk egg. Whisking constantly, slowly add milk mixture to the eggs. Add liquid to dry ingredients to form a dough and knead until smooth – 6 to 8 minutes. Spray a plastic bag with vegetable spray and store in cooler.

For filling:
½ cup brown sugar
¾ cup sugar (1/2 cup for filling, ¼ cup for dipping)
2-3 tablespoons of cinnamon
One stick butter (6 tablespoons for filling, 2 tablespoons for dipping)

When ready to use, line the Dutch oven with foil and spray with cooking spray. Punch down dough, divide in half and roll into a 5” by 12” square. Melt butter and spread 6 tablespoons on the dough. Top with mixture of brown sugar, ½ cup sugar and cinnamon. Roll into a log from the short side, and cut into 5 1" pieces. Dip in remaining butter and remaining sugar and place in Dutch oven sugar side up. Allow to rise while the charcoal fires and reaches a grey coating of ash. Set the Dutch oven over coals or charcoal with 1/3 of the coals below, and 2/3 of the coals on the lid (most of the heat should be on the lid). Cook for around 30 minutes, turning frequently to prevent hot spots.

This recipe will make 10 large cinnamon rolls, but you can bake them half at a time with the remaining dough staying in the cooler. In cold weather you will need to warm the Dutch oven in advance.

Yeast Bread – Dinner Rolls

This dough can also be modified for dinner rolls

1 package dry active yeast
4 cups flour
1/3 cup of honey
1 cup milk
6 tablespoons butter
Dash of salt
1 large egg

In a bowl, mix flour with yeast. Warm milk, butter, salt and honey in pan until butter is melted and honey is dissolved. In separate bowl whisk egg. Whisking constantly, slowly add milk mixture to the eggs. Add liquid to dry ingredients to for a dough and knead until smooth – 6 to 8 minutes. Spray a plastic bag with vegetable spray and store in cooler.

When ready to use, line the Dutch oven with foil and spray with cooking spray. Punch down dough and form into ball. Divide and shape into balls, pulling down the sides, pinching the bottom, and setting in Dutch oven just touching, seam side down. Allow to rise while the charcoal fires and reaches a grey coating of ash. Set the Dutch oven over coals or charcoal with 1/3 of the coals below, and 2/3 of the coals on the lid (most of the heat should be on the lid). Cook for around 30 minutes, turning frequently to prevent hot spots.

This recipe will make 16 dinner rolls, but you can bake them half at a time with the remaining dough staying in the cooler. I have also done half as dinner rolls and half as cinnamon rolls.

Biscuits baking in a Campers Kitchen
Bakewell Cream Biscuits

Bob Latshaw told me that one of the questions on his Registered Maine Guide test was how to make biscuits. The correct answer - with the Original Bakewell Cream.  Here is the recipe from Lisa DeHart and 3-Minutes with a Maine Guide.

4 cups flour
4 tsp Original Bakewell Cream
2 tsp baking soda
1 tsp salt
½ cup (8 tbsp) shortening (or butter)
1 ½ cups milk (powdered milk is fine)

Best strawberry shortcake ever!
Mix dry ingredients and cut-in shortening (food processor does this quick, or freeze and grate). Place in ziplock bag. Place powdered milk in small ziplock bag -  they can be stored together. In camp, add water to powdered milk and add to biscuit mix to make dough. Knead lightly - do not over knead as it makes the biscuits tough. Cut into biscuits and set in the Dutch oven, coating the top with melted butter. Set the Dutch oven over coals or charcoal with 1/3 of the coals below, and 2/3 of the coals on the lid (most of the heat should be on the lid). Cook for around 30 minutes, turning frequently to prevent hot spots.

Bakewell Cream Cinnamon Rolls

Bakewell Cream biscuit mix (you can also use 2 cans of Pillsbury biscuits) 
1 stick (8 tbsp) melted butter
½ cup brown sugar
½ cup white sugar
3 tbsp ground cinnamon

Add sugars and cinnamon to melted butter to make a paste. Place in ziploc bag. In camp, roll out biscuit dough in a rectangle. Cover with sugar/cinnamon paste. Roll up in a log and cut in 2” pieces. and set in the Dutch oven. coating the top with melted butter and sugar. Set the Dutch oven over coals or charcoal with 1/3 of the coals below, and 2/3 of the coals on the lid (most of the heat should be on the lid). Cook for around 30 minutes, turning frequently to prevent hot spots.

Monkey Bread

Bakewell cream biscuit mix (you can also use 2 rolls of Pillsbury biscuits) 
½ cup sugar
½ cup brown sugar
3 tbsp cinnamon
1 stick (8 tbsp) melted butter

Line the Dutch oven with foil and spray with cooking spray. In camp, roll out biscuit dough and cut into small pieces. Mix sugars and cinnamon in plastic bag. Drop each piece into the sugar and shake to coat well. Place the coated biscuit pieces in the Dutch oven. In a separate pan, melt the butter and pour over biscuits. Set the Dutch oven over coals or charcoal with 1/3 of the coals below, and 2/3 of the coals on the lid (most of the heat should be on the lid). Cook for around 30 minutes, turning frequently to prevent hot spots.

Brownies

One box Brownie mix
Oil, eggs and water as called for by the mix

You could make your own, but it is easier to use a mix. I mix the wet ingredients together in advance according to the package directions and store in a sealable travel container in the cooler. When it is time to cook the brownies, line the Dutch oven with foil and spray with cooking spray. Mix the brownie mix with the wet ingredient and pour into Dutch oven. Set the Dutch oven over coals or charcoal with 1/3 of the coals below, and 2/3 of the coals on the lid (most of the heat should be on the lid). Cook for around 30 minutes, turning frequently to prevent hot spots. You can also mix in nuts, chocolate bits, M&M's or mini marshmallows. If you don't have your Dutch oven you can also use wet heat.

Tuesday, December 26, 2023

Paddle Map for 2023

I got this cool travel map from Jennie for Christmas, and plotted my adventures for 2023 - yellow is sea kayak, light blue is flatwater, dark blue is whitewater, red is hiking and green is camping.  


One camping trip in ME, a few whitewater trips in NH, but I didn't make to VT this year. Most of my paddling was local - RI, CT and MA. Hopefully one more trip before the year ends.  

Monday, December 18, 2023

Winter Camping

We are planning to do an overnight camping trip on New Year’s weekend, so it’s time to think about cold weather camping. At this point, we are not expecting snow, possibly rain and relatively warm temperatures (days in the 40’s, and night in the 30’s), but there are still some things to consider when camping in cold weather.

Tent - a three-season tent will probably work fine for this trip, but a four-season tent is even better. A four-season tent is designed to withstand heavy snow and wind. The tent fabric is heavier, which allows it to retain heat better. I'll be using my father's Eureka! Expedition. You can't find this tent today, but it was originally designed as a mountaineering tent. Here are a couple of advertisements from the late 1980's. 


Sleeping Bag – to ensure comfort on cold nights, it’s a good idea to use a bag that's rated at least 10° colder than the temperature you will be out in. I have my father's Sumberjack Quallofil winter bag with draft tubes at the zippers, and drawstrings at the shoulders and on the hood to help keep the heat in the bag. I can't tell from the bag itself, but it looks like what they used to sell as the Boundry 0.

Sleeping Pads - in cold weather its best to use two sleeping pads to keep from losing heat to the cold ground - a closed-cell foam pad on the tent floor, and an inflatable pad on top of that. Pads designed for winter use usually have an R-value of about 4.0 or higher. I'll use my father's ¼” closed-cell foam pad and a Klymit Static V insulated pad with an R-value of 4.4. I also have my father's original Therm-a-Rest - they don't make them like that anymore.

Clothes – as always, dress in layers to match the conditions – a base layer next to the skin, then insulating layers to provide warmth, and finally outer layers to protect against rain and wind. Look for synthetic fabrics or wool that dry quickly and wick perspiration away from your body. Don’t forget a hat, gloves and appropriate footwear for the conditions. Be sure to adjust your layering before you over-heat or get cold, and bring warm, dry cloths to sleep in.

Stoves - liquid-fuel stoves like the Whisperlite work fine in below-freezing temperatures. Canister stoves like my Jetboil need to be kept above freezing to produce vapors and work properly. When in doubt, cook on the fire.

Food – your body generates heat as it digests food, so if you’re feeling cold try eating some food. (Moving around will also help.) Before you go to bed, have a snack to keep your metabolism going and keep a candy bar nearby if you get cold in the middle of the night. I don't think we will need to worry about having enough food with this group.

Water - don't forget to stay hydrated. I usually bring jugged water, but in the winter you may need to pump or melt water. 

I'm lucky that my father was a winter hiker, so I have a lot of his old gear. For real winter camping you need to get out in the snow, but we'll try that another time.

Sunday, December 17, 2023

The Christmas Canoe

Another one to save for the future...

Not sure it beats my big red canoe Christmas Story, but it is good. Ray saw this on Facebook and posted about a Quebec beer - La Maudite - that uses the flying canoe as its logo. It evokes the legend of La Chasse-galerie - the flying canoe - that tells the story of men who would made a deal with the devil to fly home in a canoe to spend a night with their loved ones. This also earned another poem from Tom.

a Chasse-galerie,
the Devil put in play.
Feather paddle through sky. Curse words won't fly.
Avec mon cher dans Christmas Day.
TW

Links:

Thursday, December 14, 2023

How to Trim a Canoe

Stern trim in my Wildfire
How your canoe 
is trimmed can have a great impact on the way it paddles. I have dedicated solo boats for flatwater and whitewater, and both are trimmed slightly stern heavy. It wasn’t a conscious decision on my part, that’s the way they were set up when I got the boats. Moving around to change the trim really isn’t an option without moving the seat or the pedestal, and I’m fine with the trim as it is. I’m also a little heavy for these boats so they sit a little lower in the water.

For normal paddling, having the boat slightly stern heavy frees the bow and weights the stern so it is easier to go straight. You can lean forward to engage the bow and release the stern for turns. Healing (edging, leaning, whatever term you use) will also release the stems when you turn. Some asymmetrical canoe designs build this feature into the boat (more bow rocker like my Yellowstone Solo or Outrage) so you can have a more neutral trim.

Stern trim in my Outrage
For river paddling, a slightly stern heavy trim makes it easier to paddle upstream, to surf or to do upstream ferries. I do mostly river paddling. In wind, stern heavy is OK when paddling in a tailwind, but problematic in a headwind or even a beam (side) wind. The bow is going to tend to get blown downwind requiring lots of corrections. If you have gear in the boat that you can use to adjust the trim, that helps. Otherwise you just have to deal with it.

In waves you want the stems as light as possible to allow them to ride up and down the waves, so neutral trim is best. In my case I paddle mostly rivers, and I can usually manage by leaning back to lighten the bow when going through wave trains. Once again, some asymmetrical canoe designs build this feature into the boat with a fish-form design (widest section forward of the centerline like my Outrage) to increase buoyancy of the bow for rising over waves, so you can have a more neutral trim. It is all theoretical until you get out and paddle to figure out what works for you with your boat.

River Knives

There was a post on P.com on attaching a river knife to your PFD. I’ve had an NRS Pilot knife on my PFD for years – once you attach the clip the lash tab it is never coming off. To be honest, I’ve never been in a situation where I needed to use it for anything other than spreading peanut butter. The blade definitely rusts over time. When it gets too rusty I buy a new knife (cheap, so maybe you get what you pay for). They hadn’t changed the design in years, so the new knife still fit in the old clip. I knife I have is now in close-out, so I just bought one last knife

NRS Pilot River Knife
I never thought to actually try to cut rope with this knife until I saw this video. Just like in the video, it took 5-6 swipes to get through an old safety rope. I think the little cutting hook at the base of the blade made it harder to get through the rope. I had better luck with just the serrated section of the blade. On the newer version that hook is a lot smaller.

Just for kicks, I dug out my father’s old river knife – turns out it’s a Gerber Blackie Collins River Master. There are different versions of this knife, and all are rare and collectible. This is the version that I have. 

Gerber Blackie Collins
River Master Knife
With a longer blade and better serrations it usually cut through the rope on the first or second swipe. Leave it to my father – he always bought the good stuff. I’ve never used it as a river knife. It’s been in my kitchen kit for years. It still has a sharp factory edge, so I guess I’ll keep it there.

Saturday, December 9, 2023

Noanet Woods - December 9, 2024

Noanet Peak
It has been a while since I have been out on a hike, and I didn’t see any paddling trips today, so I decided to join Papa Joe and the crew at Noanet Woods in Dover, MA.

Noanet Woods has 17 miles of trails adjacent to the Hale Reserve. We started our hike at the Powissett Street entrance and hiked into the Hale Reserve. From there, we hiked over to the Mill Ponds to check out the old mill site and dam. Then, we hiked up to the Noanet Peak to check out the view of Boston before heading back to the cars.

Thursday, December 7, 2023

Planning a Sea Kayak Expedition

Imagine sitting on the beach as the sun sets in distance. Or exploring islands that you can only reach in your sea kayak. Planning a multi-day sea kayak expedition can get you to these places, but is very different than planning a day-trip. Here are some things to think about as you plan your sea kayak expedition.

Know your group.

The trip that you do will be largely driven by the goals, skills and experience of the group. The group should be large enough to provide support and comradery, but small enough not to impact the environment. Four to six paddlers is usually the maximum group size.

Where will you go

Pick a location that is appropriate for the skills of the group and plan your route with options to avoid getting weather bound if conditions change. You may need to stay in protected areas when conditions are challenging, and move out into open water to cover distance when they improve.

Planning your trip

Planning can begin as soon as you choose your expedition location. Begin thinking about paddling distances, camping locations, tides and local conditions. You will need to build flexibility into your plan to account for changing weather conditions, and it might be a good idea to include a lay-over day just in case. For longer trips, you will also need to think about resupply locations for fresh food and water.

Navigation

Since you will be traveling along potentially unfamiliar shorelines, good navigation skills will be needed. You will need navigational charts and maps for the area. You will also need a deck mounted compass for following a heading, and a hand compass for taking bearings and working out your location. A GPS can help your navigation if you have already entered way points for lunch spots, campsites, etc.

Packing your sea kayak

When packing your kayak, you need to be careful to keep the boat trim by distributing the weight evenly from bow to stern. Try to pack heavy items like food and water toward the middle, and lighter items like sleeping bags and clothing in the ends. You will need a variety of drybags to protect gear that needs to stay dry but still needs to fit through those oddly shaped hatches.

Here is what I bring, and how I pack it in 
my P&H Capella 166 RM:

Paddling Gear

Kayak with bulkheads and hatch covers
Paddle
PFD
Hat
Sunglasses
Camera (PFD pocket)
Paddle Shoes
Spray Skirt
Bilge Pump (behind seat)
Paddle Float (behind seat)
Tow Belt

Deck

Spare Paddle
Charts/Maps (waterproof case)
Hand compass (waterproof case)
GPS
Deck mounted compass
Water Bottle

Front Hatch (tends to be the driest)


Sleeping Bag
Sleeping Pad/Pillow
Camp Clothes (appropriate for season and length of trip)
Camp Shoes
Personal Items (Poop Kit, Flashlight/Head Lamp, Toiletries)
Electronics (Phone/Satellite Communication Device)

Rear Hatch

Tent with Ground Cloth and Stakes
Tarp with Poles and Stakes
Camp Chair
Mess Kit
Stove with Extra Fuel
Fire Kit (Starter, Matches, Hatchet and Saw)
Clean-up Kit (Soap with Scrubby)
Hand Sanitizer

Day Hatch

Paddle Jacket
Snacks
Sunscreen
Bug Spray
Water (appropriate for length of trip)
Food (appropriate for length of trip)
First Aid Kit

When paddling with others, you might be able to consolidate gear and bring some other luxury items.

Choosing your campsite

In most cases, your campsite choices will be limited to established campsites. When choosing a campsite, you should look for a site that provides shelter from the prevailing winds, has enough flat ground above the high-tide mark for the group to set up tents, and minimizes the carry up and down the beach to the campsite if you are landing or launching at low tide. You also need to think about the site's orientation to morning winds and tides so you can launch in safe coonditions.

Setting up/taking down camp

On arriving you need to move your boat and gear above the high tide mark. If it is a short carry you might be able to carry boat with the gear loaded, but often it is easy to empty the boat first into a mesh sack or IKEA bag. Once the boat is safely stowed you can turn your attention to setting up your tent (and tarp if needed), gathering wood if you plan to have a fire, and cooking dinner.

The process of for taking down camp in the morning is pretty much the inverse – cooking breakfast, packing up your tent and gear, and loading the boat. To the extent possible, you should leave no trace – carry out everything that you carried in. 

Tents

Tents are available in many styles from tunnel to A-frame to geodesic dome. When choosing a tent think about the space that you need and the conditions you will be out in. Choose a tent with plenty of headroom, a full fly and good ventilation. When camping in exposed areas, your tent will need to withstand high winds and potentially heavy rain.

Sleeping Bags and Pads

The sleeping bag you use will depend on the season and the weather. To ensure comfort on cold nights, it’s a good idea to use a bag that's rated at least 10° colder than the temperature you will be out in. The sleeping bag's fill can be down or synthetic. Down bags pack small, but can be difficult to dry if they get wet. Synthetic bags are bulkier, but are easier to dry.

Sleeping pads have two functions - comfort and insulation. Inflatable sleeping pads are usually the best option due to their small sized when deflated. Inflatable pads have come a long way in terms of comfort and durability, but can be a little pricey - don’t skimp. Pads designed for colder weather usually have an R-rating of 4.0 or higher.

Camp cooking

The trip you do will definitely influence the food that you bring. In a sea kayak you have limited space, so a backpacking stove is the best option. The easiest meals are dehydrated or freeze dried since they are light, take up little space and are easy to prepare and pack out. If you have room you can cook fresh food on the stove or on the fire, but you will also need to bring pots, pans and utensils.

Should I bring or collect water?

Between drinking and cooking, most people will need around 2-liters of water a day. It is best to carry fresh water in water bag or plastic bottle (2-liter soda bottles work well). If you are going to be collecting water from natural sources you will need to boil, chemically treat (Aquatabs) or filter the water before using.

Campfire

If your campsite allows a campfire, be sure to use the established fire ring, or have your fire on the beach where it will have a minimal environmental impact. A fire pan is also a good option, and makes it easier to clean up the fire pit before you leave.

When collecting wood you will need a mixture of sizes from small to large - tinder to light the fire, kindling to establish the fire and fuel to feed the fire. Firewood should be collected selectively to leave the site and scenery as undisturbed as possible. A folding saw or small hatchet will make processing wood easier, and driftwood or standing/hanging deadwood are usually the driest.

Leave no trace

Aways leave the campsite better than you found it. You will need to pack out everything that you bring in, and that may include human waste if the campsite does not have a privy.

Links:

Wednesday, December 6, 2023

Baking with Steam

What you need
I’m always looking for different ways to cook in camp. I love to make baked goods, but lugging the Dutch oven along can be a pain. I saw an ad on Facebook for the Can Cooker, and it intrigued me, so I thought I would give it a try. This method can be used to bake on the stove (or fire) using moist heat/steam.

When you bake a cake in the oven (or Dutch oven), dry heat surrounds the cake. The water contained in the batter evaporates, creating steam that helps the cake rise before it sets and gets firmer. While steam does play a role in baking in dry heat, the results are much different when it acts as the main cooking method.

Covered cake pan on the rack
Steaming a cake on the stove relies on moist heat. Using a double boiler of sorts, you elevate the pan on a rack above steaming water inside large, lidded pot. Steam creates the heat that gently cooks the cake. Because the moist environment prevents the water in the batter from quickly evaporating, less water is lost in the cooking process, resulting in a moister cake. Since baking with steam is done at a lower temperature (212 degrees for steam vs. 350 degrees in a dry oven), the cake will not brown.

Even at a lower temperature, though, steam will cook the cake faster than dry heat since it transfers heat more efficiently than air. Steaming a cake will take between 20 and 25 minutes, while dry baking it at 350 degrees will take 30 to 40 minutes.

Closed up for baking -
the frying pan on the top is just
there for weight
This method works for cakes, quick breads and brownies. You could also use it for a main dish like meatloaf or steamed fish and vegetables - just increase the cooking time. What will you need:
  • Stove with the ability to hold a pan of water at a low boil. If you are careful, you could do it on the fire, but maintaining the proper temperature might be tough.
  • Set of nesting pans - the larger must have a tight fitting cover.
  • A rack to raise the inner pan out of the water like a double boiler. In camp you could improvise - couple of small rocks would work fine.
  • Cooking spray.
  • Wax paper to line the bottom of the cake pan
  • Aluminum foil to cover the inner pan
The finished corn bread in the pan
Here's how you do it:

  1. Fire up your stove
  2. Place the rack in the large pan and add enough water so that it is just below the rack. Cover, put the pan on the stove, and bring the water to a boil.
  3. While waiting for the water to boil, mix up the batter for whatever it is that you want to bake. Spray the inside of the smaller pan with cooking spray and add the batter. (Lining the bottom with wax paper will help the cake release easier from the pan when cooked.) Cover the top tightly with aluminum foil to prevent water from condensing onto the food and making it soggy.
  4. Once the water boils, reduce to a low boil and put the smaller pan on the rack inside the larger pan. Replace the cover and don’t remove for 20 to 25 minutes. You want just enough steam in the pan to cook the cake. 
The finished corn bread removed 
The cake is done when a toothpick inserted in the center comes out clean. Let it rest a few minutes before releasing the sides and removing from the pan. 

I'd definitely call this experiment a success. The key is to cover the inner pan with foil to prevent condensed water from dripping on to the cake and making it rubbery. These pictures are Jiffy Mix cornbread, which came out perfect - just add chili for a great dinner.

Sunday, December 3, 2023

Santa Paddle at Wickford Harbor - December 2, 2023

Santa's elves are ready to launch
Its that time of the year when Santa visits cities and towns around the country to get kids excited for Christmas. Usually he arrives by fire truck, but in the coastal village of Wickford he arrives by fire boat, and RICKA members dress-up like elves to escort him down the harbor into town. This year, Michelle decided to come along as well to watch and take some pictures 
from shore.

Wickford is located on the West Passage of Narragansett Bay, and is built around a large, well-protected harbor. It was settled in the early 17th century when Roger William purchased land from the Narragansett Indians and established a trading post. Wickford grew to become a major port and shipbuilding center.

This elf is ready to go
Today, Wickford is a picturesque village whose waterfront streets are lined with shops, restaurants and colonial-era homes. Each year the North Kingstown Chamber of Commerce organizes a Festival of Lights with holiday themed actives. Since 2010, RICKA has participated in this event by escorting Santa down the harbor for his big arrival at the Town Dock.

We arrived at the put-in at the end of Main Street next to Gardners Wharf Seafood at around 11:30 to decorate our boats and get our elf hats and candy canes from Pat. At around 12:10, Michelle walked down to the dock and the rest of us headed over to meet up with Santa for the paddle into town. I am always amazed at the crowd that gathers for this event. 


And I got another poem from Tom - this time on Facebook.

What is appeal
neath cone of teal
with a Blitzen towards the bow?
Well is not it pleasant
that behind the present
canoe there's an elfish pal?
TW

Links: