Showing posts with label camping skills. Show all posts

Saturday, August 15, 2026

Snow Peak Amenity Dome Medium

Two openings in the vestibule
Now that I am retired, I will finally be able to join the RICKA Adirondacks trip. I’ll be canoe-camping for 3 nights with Aaron on the Oswegatchie River, and then join Bill and the RICKA crew for day-trips based out of Lake Eaton Campground.

I dug out the old Eureka Mountain Pass 3XTE that I usually use for base-camping and found that the plastic windows in the fly had degraded and cracked. It's nothing that can't be fixed with duck tape, but it wasn’t quite as big as I wanted, so I decided to look for a new base-camping tent.

View from the front
I wanted a tent with a full fly, plenty of interior room for a cot or large air mattress and a large vestibule to get out of the rain. I ended up with the Snow Peak Amenity Dome Medium. Since it was a discontinued model the price was right.

The Snow Peak Amenity Dome Medium is a 3-season, 4-person, Japanese-style tent that trades some interior standing room for durability in challenging weather. Spec’s are:
  • Fly including Vestibule: 16.6' x 9.2’
  • Sleeping Tent: 8.8’ x 8.8’
  • Peak Height: 4.9’
Front flap set up as an awning
The packed size is 29" x 9.8" x 8.7" in its carrying case with a total weight of 19.6 lbs. It’s a big tent that takes up a lot of room in the canoe and the campsite.

While most car-camping tents prioritize stand-up ceiling height, this Japanese-style tent is intentionally built low to the ground to survive severe wind and heavy rain. The tent is divided into two distinct zones – a sleeping area and a front vestibule or “porch”. The front vestibule extends the length of the fly by 7.8 ft and can be used as an outdoor kitchen, lounge, gear garage, or a dry entryway during downpours.

All closed up
The front vestibule can be opened from a large front flap or zippered side panel. This allows you to close off the side facing the wind or rain while keeping the other side open for ventilation. The front flap can also be set up with poles to become an awning.

I also bought an 8’ x 8’ ground cloth, a cot and small folding table to put inside. I think it is going to work out fine.

Plenty of room inside with a twin-size air mattress
Links:

Friday, May 8, 2026

Coleman Camp Oven

Biscuits ready to go in the oven
I’ve been looking for a light-weight alternative to my Dutch oven. I have a reflector oven that works great when you have a big fire, but I also wanted to try a Coleman Camp Oven that sits on a stove.

Like the reflector oven, the Coleman Camp Oven is an aluminum box that folds flat for easy storage. Unlike a reflector oven that uses heat reflected from an open fire, the camp oven sits on a camp stove burner and uses convection (heat circulating in the box) and radiant heat (absorbed by the box and radiated back) to cook/bake food much like a conventional oven.

Cornbread coming out of the oven
Unfolding the oven is as easy as opening a box. It has built in latches that you use to attach the top, bottom and sides together. It comes with a steel baking rack that can be set at three different heights.

There is a thermometer on the door that you can use to track the oven temperature. Many people say the door thermometer is inaccurate and rely on an oven thermometer or heat probe instead. When I used mine, the door thermometer seemed fine.

Bakewell Cream Biscuits
Because the oven is single-skinned, it can lose a lot of heat to the surrounding air - especially in cold weather. To combat this you can seal any openings with fire resistant aluminum tape, cover the top with aluminum foil, or wrap the outside with a fire resistant cover to trap the heat.

Another issue with the thin metal skin is that heat radiates unevenly inside the stove. Some users place a heat sink (bricks, pizza stone, cast iron press) in the bottom of the stove to better radiate heat. Lugging around something to serve as a heat sink does eliminate one of the great benefits of the oven – its relatively light weight.

Jiffy cornbread
The oven is designed to sit on a two burner Coleman stove, but any stove that will support its 12” x 12” base will work fine. I used a single burner Coleman Powerpack and it worked great. It was able to maintain consistant temperature even with a low flame. Backpacking stoves are too small to support the oven.

When cooking outside you need to provide a wind screen to provide protection from the wind. Cold temperatures will also increase heat loss from the oven and reduce the efficiency of propane stoves. The manual recommends using 8” round or square pans to allow for good air circulation inside the stove.

Yeasted dinner rolls
I gave my oven a try with biscuits (Bakewell Cream of course), cornbread (Jiffy mix from the box) and yeasted dinner rolls. All three were baked in an 8” round pan with the rack in the middle. The thermometer seemed accurate. I started the biscuits at 450, and turned them down to 325-350 after 5-minutes. I baked the cornbread and dinner rolls at around 325-350. I didn’t really track time. When the sides started to brown I took them out to avoid burning the bottom. They all baked fine but didn’t brown on the top – even the dinner rolls that I topped with butter before baking.

Overall, it is a nice little oven. It will be a nice addition when I already have a large stove along, or when fires aren't allowed. It works great to keep things warm, to cook casseroles, to roast meats, or to bake biscuits, cookies, breads or cakes. Not sure it will replace my Dutch oven though.

p.s.- I've now also tried the camp oven with cinnamon rolls in an 8" pan. It was a warm day with good yeast, so the rose really high. I kept the temperature around 250 on the door thermometer, and rotated the pan frequently. If it got too hot, I turned off the burner or opened the door. They cooked for about an hour.

Cinnamon Rolls
Links:

Saturday, February 14, 2026

Eureka Expedition Sentinel

Eureka Expedition Sentinel
on the Connecticut River
I finally found some information on my father’s old tent. It’s a Eureka Expedition Sentinel 2-person, four-season mountaineering tent. Spec’s are:

Size – 6’ x 8’ (but tapers down to 4’ at the ends)
Height – 3’ 10” in middle
Weight – 7 lbs. 6 oz.
Fold Size – 6’ x 20”

Inside view
It is a symmetrical tent with screened doors at both ends for easy entry/exit and good ventilation. The middle of the tent has a hoop allowing for more head and shoulder room. From this center hoop the body of the tent tapers down to Timberline style A-frames. The aluminum poles are shock-corded and break down to 20”.

The full fly is slightly hooded at both ends. It creates the second layer of the tent’s double wall construction. Air circulates freely in the space between the tent and the fly minimizing condensation and increasing insulation. There are 2 hooks on each side connecting the fly to the tent that pull out the side walls creating additional room inside. 

Under a tarp on the Moose River Bow
The tent is held down with 6 stakes, and the fly is held down with 4 S-hooks at the corners and 6 stakes along the sides. There are also 10 D-rings on the fly to attach guy lines. The tent is pretty bomb-proof in the wind without guy lines, so I've never used them.

With its hybrid hoop/A-frame design, the Sentinel was similar to the three-season Alpine Meadows, but with lower ends and heavier materials. The Alpenlite might be seen as its successor.

Eureka advertisement from the 1980's featuring a Sentinel like mine

Monday, January 19, 2026

Introduction to Canoe Camping - January 18, 2026

I was glad to be one of the presenters at the NH/AMC’s Introduction to Canoe Camping. The session was focused on paddlers interested in moving into wilderness tripping. Presentations included Trip Planning and Organization (Jonathan), Necessary Skills (Bob), Boats and Paddling Gear (me), Camping Gear (Deb), and Food and Cooking (Cathy). In addition, several presenters did presentations on their favorite trips (I did the Connecticut River), and there was a Show and Tell table where folks could see and ask questions about gear. It was a great session, and very well received.

Monday, January 5, 2026

Reflector Oven

Get the flames going
I love bringing my Dutch Oven along when camping. It is great for baking just about anything, but it is a pain to lug around. I've always thought that a reflector oven would be lot easier on trips where weight is an issue.

When we went to the Allagash in the Fall, a friend brought his reflector oven, so I got to practice with him. We made baked peaches with cinnamon and sugar (worked great), pork lion (baked while the rest of dinner was cooking, but did need to be finished in the frying pan), and cinnamon rolls (let them go just a little too long, but they came out OK).

Cinnamon rolls 
A reflector oven is basically an aluminum box with one side open to capture radiant heat provided by an open fire. Mine is the Svante Freden from Sweden. The oven folds flat for easy storage. The food to be baked is placed on the shelf in the oven. The amount of energy captured by the oven depends on the temperature of the fire and the oven’s distance from the fire.

The real trick of cooking in a reflector oven is controlling the fire. You need a good, hot fire with lots of flames. The best fire for the reflector is a log-cabin or teepee built to the height of the oven’s cooking shelf so that the flames are above the food. Be sure to have lots of dry wood on hand, as you will need to keep those steady flames going for the entire time you are baking. You can also take well-burning logs and stand them on end.

Letting the flames do the work
You can estimate the temperature by holding your hand just in front of the oven. If you can hold it there for around 5 seconds, the oven temperature is around 350 degrees. If the cooking temperature seems too hot or too cold, you can move the oven backward or forward to adjust it. Start with the oven about 8" from the fire.

The slanting top and bottom of the reflector direct the heat from the fire toward the food being cooked. The temperature is hotter at the back and at the front, so you need to rotate the pan frequently to prevent hot spots and allow for even baking.

The whole meal is cooking -
reflector oven, Big Daddy
skillet and Dutch oven
You need to be very careful working around an open fire, and because you are cooking with radiant heat, the oven and pan will get ripping hot. It’s a good idea to bring oven mitts for protection.

What can you bake in a reflector oven? The short answer is just about anything - breads, biscuits, cookies, brownies all work fine. With time and patience, you can even do casseroles and roasted meats.

Bannock (Gil Gilpatrick's "Canoe Country Bread" recipe)

4 cups flour
1/2 cup sugar
4 tsps baking powder
3 tsps salt
Few table spoons of water

Mix ingredients with a few tablespoons water. Bake until bread rises, is browned, crust is stiff when tapped, and knife blade inserted into bread comes out clean. It can be baked in a fry pan with a little oil, on a stick, or in a reflector oven. 

Biscuits

3 cups flour
6 tablespoons baking powder
½ teaspoon salt
6 tablespoons oil
1 cup milk

Mix ingredients. Roll on a flat, flour-covered surface. Cut out biscuits and place in baking pan. Bake until browned and stiff, and knife blade inserted into biscuits comes out clean.

Chocolate Chip Cookies

2½ cups flour
½ teaspoon baking soda
¼ teaspoon salt
½ cup unsweetened cocoa powder
1 cup dark brown sugar, packed
¾ cup white sugar
1 cup butter, softened
3 eggs
2 teaspoons vanilla
2 cups (12 ounces) semisweet chocolate chips

In a bowl, combine flour, baking soda, salt, cocoa powder. Mix well, set aside. In separate bowl, blend sugars well. Add butter, beat to form grainy paste. Add eggs, vanilla. Beat until light and fluffy. Add flour mixture, chocolate chips. Blend until just combined. Drop by spoonfuls onto pan. Bake until edges just start to brown. You can also use prepared cookie dough.

Brownies

1 cup sugar
½ cup shortening
2 eggs
½ cup flour
2 squares melted baking chocolate
½ teaspoon vanilla
pinch salt

Mix ingredients well. Pour into greased 8-inch square pan. Bake until knife inserted into brownies comes out clean. You can also use a store bought brownie mix.

Muffins/Quick Breads

Store-bought muffins or quick breads bake fine in a reflector oven. 

Wednesday, July 9, 2025

Introduction to Canoe/Kayak Camping - July 9, 2025

Chuck and I did a virtual canoe/kayak camping training for RICKA last night. Not a bad turn out – great questions and discussion. Here is the recording.

If you go to the description on the Vimeo page, you will see a list of the topics that we covered with the time stamp. Click the time stamp and it will take you to that section of the video.

Saturday, January 18, 2025

Introduction to Canoe Camping – January 18, 2025

I was glad to be one of the presenters at the NH/AMC’s Introduction to Canoe Camping. The session was focused on paddlers interested in moving into wilderness tripping. Presentations included Trip Planning and Organization (Jonathan), Necessary Skills (Bob), Boats and Paddling Gear (me), Camping Gear (Deb), and Food and Cooking. In addition, several presenters did presentations on their favorite trips (I did the Connecticut River), and there was a Show and Tell table where folks could see and ask questions about gear. It was a great session, and very well received.

Introducing my favorite trip video on the Connecticut River
Links:

Tuesday, October 1, 2024

Planning a Sea Kayak Expedition

Imagine sitting on the beach as the sun sets in distance, or exploring islands that you can only reach in your sea kayak. Planning a multi-day sea kayak expedition can get you to these places, but is very different than planning a day-trip. Here are some things to think about as you plan your sea kayak expedition.

Know your group.

The trip that you do will be largely driven by the goals, skills and experience of the group. The group should be large enough to provide support and camaraderie, but small enough not to impact the environment. Four to six paddlers is usually the maximum group size.

Where will you go

Pick a location that is appropriate for the skills of the group and plan your route with options to avoid getting weather bound if conditions change. You may need to stay in protected areas when conditions are challenging, and move out into open water to cover distance when they improve.

Planning your trip

Planning can begin as soon as you choose your expedition location. Begin thinking about paddling distances, camping locations, tides and local conditions. You will need to build flexibility into your plan to account for changing weather conditions, and it might be a good idea to include a lay-over day just in case. For longer trips, you will also need to think about resupply locations for fresh food and water.

Navigation

Since you will be traveling along potentially unfamiliar shorelines, good navigation skills will be needed. You will need navigational charts and maps for the area. You will also need a deck mounted compass for following a heading, and a hand compass for taking bearings and working out your location. A GPS can help your navigation if you have already entered way points for lunch spots, campsites, etc.

Packing your sea kayak

Packing for a multi-day trip is both an art and a science. You need to consider the size and shape of your gear, how you are going to keep it dry, and how weight distribution effects the performance of your boat.
 
Even if you boat is dry, it is best to assume that your hatches are going to leak – at least a little. Pack anything that absolutely must stay dry like your sleeping bag, camp clothes and sensitive electronics in durable polyurethane-coated dry bags. You will need a variety of small drybags to fit your gear in those oddly shaped hatches. 

Water inside your hatches will pool at the lowest point (usually around the cockpit and day hatch). Pack items that must stay dry higher in the hatch just under the deck, and out towards the ends of the boat – especially the front. 

When packing your kayak, you need to be careful to keep the boat trim by distributing the weight evenly from bow to stern. Pack heavy items like food and water toward the middle, and lighter items like sleeping bags and clothing in the ends. Pack the heaviest items in the bottom of the hatch, centered along the keel and closest to the cockpit. This keeps the center of gravity low and distributes weight evenly from side to side.

Keep frequently used items and safety essentials close to hatch lids so they’re readily accessible. 

Here is what I bring, and how I pack it in my P&H Capella 166 RM:

Paddling Gear

Kayak with bulkheads and hatch covers
Paddle
PFD
Hat
Sunglasses
Camera (PFD pocket)
Paddle Shoes
Spray Skirt
Bilge Pump (behind seat)
Paddle Float (behind seat)
Tow Belt

Deck

Spare Paddle
Charts/Maps (waterproof case)
Hand compass (waterproof case)
GPS
Deck mounted compass
Water Bottle

Front Hatch (tends to be the driest)


Sleeping Bag
Sleeping Pad/Pillow
Camp Clothes (appropriate for season and length of trip)
Camp Shoes
Personal Items (Poop Kit, Flashlight/Head Lamp, Toiletries)
Electronics (Phone/Satellite Communication Device)

Rear Hatch

Tent with Ground Cloth and Stakes
Tarp with Poles and Stakes
Camp Chair
Mess Kit
Stove with Extra Fuel
Fire Kit (Starter, Matches, Hatchet and Saw)
Clean-up Kit (Soap with Scrubby)
Hand Sanitizer

Day Hatch

Paddle Jacket
Snacks
Sunscreen
Bug Spray
Water (appropriate for length of trip)
Food (appropriate for length of trip)
First Aid Kit


When paddling with others, you might be able to consolidate gear and bring some other luxury items.

Choosing your campsite

In most cases, your campsite choices will be limited to established campsites. When choosing a campsite, you should look for a site that provides shelter from the prevailing winds, has enough flat ground above the high-tide mark for the group to set up tents, and minimizes the carry up and down the beach to the campsite if you are landing or launching at low tide. You also need to think about the site's orientation to morning winds and tides so you can launch in safe coonditions.

Setting up/taking down camp

On arriving you need to move your boat and gear above the high tide mark. If it is a short carry you might be able to carry boat with the gear loaded, but often it is easy to empty the boat first into a mesh sack or IKEA bag. Once the boat is safely stowed you can turn your attention to setting up your tent (and tarp if needed), gathering wood if you plan to have a fire, and cooking dinner.

The process of for taking down camp in the morning is pretty much the inverse – cooking breakfast, packing up your tent and gear, and loading the boat. To the extent possible, you should leave no trace – carry out everything that you carried in. 

Tents

Tents are available in many styles from tunnel to A-frame to geodesic dome. When choosing a tent think about the space that you need and the conditions you will be out in. Choose a tent with plenty of headroom, a full fly and good ventilation. When camping in exposed areas, your tent will need to withstand high winds and potentially heavy rain.

Sleeping Bags and Pads

The sleeping bag you use will depend on the season and the weather. To ensure comfort on cold nights, it’s a good idea to use a bag that's rated at least 10° colder than the temperature you will be out in. The sleeping bag's fill can be down or synthetic. Down bags pack small, but can be difficult to dry if they get wet. Synthetic bags are bulkier, but are easier to dry.

Sleeping pads have two functions - comfort and insulation. Inflatable sleeping pads are usually the best option due to their small sized when deflated. Inflatable pads have come a long way in terms of comfort and durability, but can be a little pricey - don’t skimp. Pads designed for colder weather usually have an R-rating of 4.0 or higher.

Camp cooking

The trip you do will definitely influence the food that you bring. In a sea kayak you have limited space, so a backpacking stove is the best option. The easiest meals are dehydrated or freeze dried since they are light, take up little space and are easy to prepare and pack out. If you have room you can cook fresh food on the stove or on the fire, but you will also need to bring pots, pans and utensils.

Should I bring or collect water?

Between drinking and cooking, most people will need around 2-liters of water a day. It is best to carry fresh water in water bag or plastic bottle (2-liter soda bottles work well). If you are going to be collecting water from natural sources you will need to boil, chemically treat (Aquatabs) or filter the water before using.

Campfire

If your campsite allows a campfire, be sure to use the established fire ring, or have your fire on the beach where it will have a minimal environmental impact. A fire pan is also a good option, and makes it easier to clean up the fire pit before you leave.

When collecting wood you will need a mixture of sizes from small to large - tinder to light the fire, kindling to establish the fire and fuel to feed the fire. Firewood should be collected selectively to leave the site and scenery as undisturbed as possible. A folding saw or small hatchet will make processing wood easier, and driftwood or standing/hanging deadwood are usually the driest.

Leave no trace

Aways leave the campsite better than you found it. You will need to pack out everything that you bring in, and that may include human waste if the campsite does not have a privy.

Links:

Sunday, December 31, 2023

Dutch Oven Cooking

For many, cooking is one of the pleasures of hanging out in camp – especially with a large group. Having a Dutch oven is like bringing your kitchen along. You can create virtually any food in camp that you can make at home.

The Dutch oven is a heavy, flat-bottomed kettle with a lid, legs, and wire handle. Traditional Dutch ovens are made of thick cast iron which absorbs heat, retains it, and distributes it evenly over the inside surface. It was designed to cook complete one-pot meals over an open fire. The legs allow you to set the pot over coals, and the lid allows you to add coals to the top for even, all-around heat. Here are some of the things you can do with a Dutch oven:
  • Simmer, boil, steam - a Dutch oven is just a heavy-duty pot with a lid, so any thing you can do in a typical pot you can do in a Dutch oven. Think: simmering soups, steaming rice, boiling water for pasta.
  • Sear, pan-fry, sauté, deep fry - a Dutch oven is also a great stand-in for a cast-iron skillet. You can place it on the grill grate or settle it into the coals on its legs to sear steaks, brown chicken thighs, sauté vegetables, or deep fry French fries.
  • Bake - the real advantage of a Dutch oven is its ability to function like an oven. By placing hot coals on the lid and underneath the body, the interior of the Dutch oven is heated equally. This allows you to bake just about anything, which is what I use if for most.
  • Braise - similar to baking, braising requires dual-direction heat. The food is cooked in a small amount of liquid which is trapped by the lid creating a moist, “low and slow” cooking environment.
For my 10" Dutch oven, 24 charcoal briquettes (1/3 below, 2/3 on lid) produces a temperature of around 350 degrees for baking. You probably won't be see a Dutch oven on a backpacking trip, but for canoe camping you’ll be glad you brought one along. Here are a few of my favorite recipes.

Henry making Dump Cake
Henry’s Blueberry “Dump Cake”


Two cans of blueberry pie filling
One box of white or yellow cake mix
One can of lemon/lime soda

This was the first recipe that I tried in my Dutch oven, and one of the easiest. Line the Dutch oven with foil and spray with cooking spray. Add the two cans of pie filling into the bottom of the Dutch oven. Next, sprinkle the cake mix over the pie filling in an even layer. Finally, pour the lemon/lime soda over the cake mix. At this point you have a decision to make – to stir or not to stir. If you stir the soda into the cake mix, your dump cake will cook with the consistency of a cake. If you don’t stir, it will cook with the consistency of a cobbler. Set the Dutch oven over coals or charcoal with 1/3 of the coals below, and 2/3 of the coals on the lid (most of the heat should be on the lid). Cook for around 30 minutes turning frequently to prevent hot spots. You can experiment with different canned or fresh fruits.

Blueberry Breakfast Bake


1-cup milk
4 eggs
1/4-cup sour cream
1/2-cup sugar
1/4-teaspoon cinnamon
1/4-teaspoon vanilla
1-cup fresh blueberries
8 slices of bread
Mable syrup - optional

Line the Dutch oven with foil and spray with cooking spray. Mix the milk, eggs, sour cream, sugar, cinnamon, and vanilla together and store in a sealable travel container. This can be kept in your cooler until your ready to make breakfast. Cut the bread into cubes and place in the Dutch oven with the fresh blueberries. Pour the milk/egg mixture over the top and mix until the bread and blueberries are coated. Set the Dutch oven over coals or charcoal with 1/3 of the coals below, and 2/3 of the coals on the lid (most of the heat should be on the lid). Cook for around 30 minutes, turning frequently to prevent hot spots. This breakfast is nice and sweet on its own, but I like it with a little maple syrup on top. You can replace the blueberries with other fresh, frozen or canned fruit.

Blueberry Bake with Dan's Peach Sauce
Dan’s Peach Sauce

Fresh peaches
Couple tablespoons Butter
Couple of tablespoons Sugar

Dice the peaches. Place in pan with butter and sugar. Place over low heat until the peaches soften and release their juices and the butter and sugar combine to create a thick sauce.  Dan cooked this with fresh peaches to top our Blueberry Breakfast Bake on one of our Allagash trips. You can do it with other fresh, frozen or caned fruit.

Frittata for breakfast
Potato and Cheese Frittata (with whatever else you want to add)

1 package frozen home fries
6-8 eggs
2 cups cheese (pick your favorite)
Other fillings can include chopped onions, peppers, mushrooms, ham, bacon or sausage

Line the Dutch oven with foil and spray with cooking spray. In separate pan, cook frozen home fries until browned and add to the bottom of the Dutch oven. Saute other fillings and add to the Dutch oven. Sprinkle with 3/4 of the cheese. Whisk the eggs and add to the Dutch oven, swirling to make sure it is even distributed. Top with remaining cheese. Set the Dutch oven over coals or charcoal with 1/3 of the coals below, and 2/3 of the coals on the lid (most of the heat should be on the lid). Cook for around 30 minutes, turning frequently to prevent hot spots.

Lasagna with onions and peppers
Lasagna


1 package no-boil lasagna noodles
15 oz ricotta cheese
1 egg
1/4 cup grated parmesan cheese
4 cups mozzarella cheese
28 oz jar of sauce (a little more is better)
Other fillings can include chopped onions, chopped peppers, chopped mushrooms, ground beef or chopped Italian sausage

Mix the ricotta cheese, egg, and parmesan cheese together and set aside (you can do this in advance and store in your cooler in a zip-lock plastic bag). In a separate pan saute the other fillings (you can also do this in advance and store in a plastic zip-lock bag in your cooler). Line the Dutch oven with foil and spray with cooking spray. Add a small amount of sauce to the bottom of the Dutch oven - enough to coat. Break the lasagna noodles to form a single layer in the Dutch oven (it doesn't have to be perfect, the noodles will expand as they cook). Layer half the ricotta cheese mixture, half the fillings, a third of the mozzarella cheese and a third of the sauce. Repeat for a second layer. Top with a last layer of noodles and the remaining sauce and cheese. Set the Dutch oven over coals or charcoal with 1/3 of the coals below, and 2/3 of the coals on the lid (most of the heat should be on the lid). Cook for around an hour, turning frequently to prevent hot spots. You may need to add more coals if it loses heat.
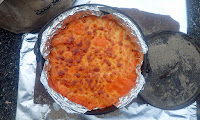
Baked Ziti
Baked Ziti

16 oz box of ziti
4 cups water
28 oz jar of sauce
8 oz ricotta cheese
1/4 cup grated parmesan cheese (if you have it)
2 cups (one package) grated mozzarella cheese
Other fillings can include chopped onions, chopped peppers, chopped mushrooms, ground beef or chopped Italian sausage

Mix the water, sauce, ricotta and parmesan cheese together and set aside (you can do this in advance and store in your cooler in a sealable travel container). Place the Dutch oven in the coals and sauté the fillings (you can also do this in advance and store in a plastic zip-lock bag in your cooler). Add the liquid mixture and bring to a low boil. Add the uncooked ziti and cook, stirring frequently until the pasta is cooked and the liquid has been absorbed. Remove Dutch oven from the coals and top with mozzarella cheese. Place the cover and coals on the top and bake until cheese is melted and golden brown - 30 to 45 minutes.

Cinnamon Rolls
Yeast Breads – Cinnamon Rolls


The easiest way to make yeast breads in camp is to make the dough in advance (night for cinnamon rolls and morning for dinner rolls) and let the dough do its first rise in the cooler. Or make the dough at home and keep it in a ziplock bag in the cooler until you need it. When you are ready to bake, take out the dough that you need, shape and let it do its second rise, and bake. Here is my grandmother’s recipe for cinnamon rolls.

For dough:
1 package dry active yeast
4 cups flour
¾ cup of sugar
1 cup milk
One stick butter
Dash of salt
2 large eggs

The rolls are ready
In a bowl, mix flour with yeast. Warm milk, butter, salt and sugar in pan until butter is melted and sugar dissolved. In separate bowl whisk egg. Whisking constantly, slowly add milk mixture to the eggs. Add liquid to dry ingredients to form a dough and knead until smooth – 6 to 8 minutes. Spray a plastic bag with vegetable spray and store in cooler.

For filling:
½ cup brown sugar
¾ cup sugar (1/2 cup for filling, ¼ cup for dipping)
2-3 tablespoons of cinnamon
One stick butter (6 tablespoons for filling, 2 tablespoons for dipping)

When ready to use, line the Dutch oven with foil and spray with cooking spray. Punch down dough, divide in half and roll into a 5” by 12” square. Melt butter and spread 6 tablespoons on the dough. Top with mixture of brown sugar, ½ cup sugar and cinnamon. Roll into a log from the short side, and cut into 5 1" pieces. Dip in remaining butter and remaining sugar and place in Dutch oven sugar side up. Allow to rise while the charcoal fires and reaches a grey coating of ash. Set the Dutch oven over coals or charcoal with 1/3 of the coals below, and 2/3 of the coals on the lid (most of the heat should be on the lid). Cook for around 30 minutes, turning frequently to prevent hot spots.

This recipe will make 10 large cinnamon rolls, but you can bake them half at a time with the remaining dough staying in the cooler. In cold weather you will need to warm the Dutch oven in advance.

Yeast Bread – Dinner Rolls

This dough can also be modified for dinner rolls

1 package dry active yeast
4 cups flour
1/3 cup of honey
1 cup milk
6 tablespoons butter
Dash of salt
1 large egg

In a bowl, mix flour with yeast. Warm milk, butter, salt and honey in pan until butter is melted and honey is dissolved. In separate bowl whisk egg. Whisking constantly, slowly add milk mixture to the eggs. Add liquid to dry ingredients to form a dough and knead until smooth – 6 to 8 minutes. Spray a plastic bag with vegetable spray and store in cooler.

When ready to use, line the Dutch oven with foil and spray with cooking spray. Punch down dough and form into ball. Divide and shape into balls, pulling down the sides, pinching the bottom, and setting in Dutch oven just touching, seam side down. Allow to rise while the charcoal fires and reaches a grey coating of ash. Set the Dutch oven over coals or charcoal with 1/3 of the coals below, and 2/3 of the coals on the lid (most of the heat should be on the lid). Cook for around 30 minutes, turning frequently to prevent hot spots.

This recipe will make 16 dinner rolls, but you can bake them half at a time with the remaining dough staying in the cooler. I have also done half as dinner rolls and half as cinnamon rolls.

Dough pressed out in the Dutch oven
Yeast Bread - Pizza

For the dough :
3 cups bread flour
2 tablespoons sugar
1 ½ teaspoon salt
Package of dry active yeast
1 1/3 cup water
1 tablespoon olive/vegetable oil

In a bowl, mix flour, sugar, salt and yeast. Add water and oil to dry ingredients to form a dough and knead until smooth – 6 to 8 minutes. Spray a plastic bag with vegetable spray and store in cooler. Dough can stored in the cooler for several days.

Pizza out of the Dutch oven
For the sauce and toppings:
Tomato Sauce
Mozzarella cheese
Peperoni, onions, pepper or whatever toppings you want to use.

When ready to use, line the Dutch oven with foil and spray with cooking spray. Punch down dough, divide in half and knead until smooth. Stretch out the dough in a circle and place in Dutch oven, pressing out until you have a thin layer across the bottom out to the sides. Top with tomato sauce, cheese and whatever topping you want to use. Set the Dutch oven over coals or charcoal with 1/3 of the coals below, and 2/3 of the coals on the lid (most of the heat should be on the lid). Cook for around 30 minutes, turning frequently to prevent hot spots. Makes two pizzas, or one loaf of bread. Top bread with olive oil and rosemary. 

Biscuits baking in a Campers Kitchen
Bakewell Cream Biscuits

Bob Latshaw told me that one of the questions on his Registered Maine Guide test was how to make biscuits. The correct answer - with the Original Bakewell Cream.  Here is the recipe from Lisa DeHart and 3-Minutes with a Maine Guide.

4 cups flour
4 tsp Original Bakewell Cream
2 tsp baking soda
1 tsp salt
½ cup (8 tbsp) shortening (or butter)
1 ½ cups milk (powdered milk is fine)

Best strawberry shortcake ever!
Mix dry ingredients and cut-in shortening (food processor does this quick, or freeze and grate). Place in ziplock bag. Place powdered milk in small ziplock bag -  they can be stored together. In camp, add water to powdered milk and add to biscuit mix to make dough. Knead lightly - do not over knead as it makes the biscuits tough. Cut into biscuits and set in the Dutch oven, coating the top with melted butter. Set the Dutch oven over coals or charcoal with 1/3 of the coals below, and 2/3 of the coals on the lid (most of the heat should be on the lid). Cook for around 30 minutes, turning frequently to prevent hot spots.

Bakewell Cream Cinnamon Rolls

Bakewell Cream biscuit mix (you can also use 2 cans of Pillsbury biscuits) 
1 stick (8 tbsp) melted butter
½ cup brown sugar
½ cup white sugar
3 tbsp ground cinnamon

Add sugars and cinnamon to melted butter to make a paste. Place in ziploc bag. In camp, roll out biscuit dough in a rectangle. Cover with sugar/cinnamon paste. Roll up in a log and cut in 2” pieces. and set in the Dutch oven, coating the top with melted butter and sugar. Set the Dutch oven over coals or charcoal with 1/3 of the coals below, and 2/3 of the coals on the lid (most of the heat should be on the lid). Cook for around 30 minutes, turning frequently to prevent hot spots.

Monkey Bread

Bakewell cream biscuit mix (you can also use 2 rolls of Pillsbury biscuits) 
½ cup sugar
½ cup brown sugar
3 tbsp cinnamon
1 stick (8 tbsp) melted butter

Line the Dutch oven with foil and spray with cooking spray. In camp, roll out biscuit dough and cut into small pieces. Mix sugars and cinnamon in plastic bag. Drop each piece into the sugar and shake to coat well. Place the coated biscuit pieces in the Dutch oven. In a separate pan, melt the butter and pour over biscuits. Set the Dutch oven over coals or charcoal with 1/3 of the coals below, and 2/3 of the coals on the lid (most of the heat should be on the lid). Cook for around 30 minutes, turning frequently to prevent hot spots.

Brownies

One box Brownie mix
Oil, eggs and water as called for by the mix

You could make your own, but it is easier to use a mix. I mix the wet ingredients together in advance according to the package directions and store in a sealable travel container in the cooler. When it is time to cook the brownies, line the Dutch oven with foil and spray with cooking spray. Mix the brownie mix with the wet ingredient and pour into Dutch oven. Set the Dutch oven over coals or charcoal with 1/3 of the coals below, and 2/3 of the coals on the lid (most of the heat should be on the lid). Cook for around 30 minutes, turning frequently to prevent hot spots. You can also mix in nuts, chocolate bits, M&M's or mini marshmallows. If you don't have your Dutch oven you can also use wet heat.

Scalloped Potatoes

8 potatoes
1 onion
3 cups milk – made from powder
3 tbsp butter
½ cup all-purpose flour
1 tsp salt
1 tsp pepper

Line the Dutch oven with foil and spray with cooking spray.  Combine flour, salt and pepper and set aside. Mix milk and set aside. Slice potatoes into thin slices and chop onion. Put a thin layer of potatoes and onion in the bottom of the Dutch oven. Sprinkle a spoonful of the flour mixture over the potatoes. Alternate layers of potatoes, onions and flour mixture. Add milk until the liquid is ½ inch below the surface of the potatoes.  Sprinkle butter around the edges of the pan. The butter will combine with the milk and flour to make a thick, creamy sauce. Set the Dutch oven over coals or charcoal with 1/3 of the coals below, and 2/3 of the coals on the lid (most of the heat should be on the lid). Cook for around 60 minutes turning frequently to prevent hot spots. 

Deep frying French Fries
French Fries

French Fries (fresh cut or frozen)
Oil to cover

Add oil to the Dutch oven and settle down in the coals. Once the oil reaches 350 degrees add the French Fries, stirring occasionally until they are evenly browned. It is helpful to have a thermometer to monitor the oil temperature. A Therma Pro meat thermometer works fine, as would an infrared temperature gun. Dealing with the oil after cooking is kind of a pain. We poured it back in the bottle and took it home with us. You could also re-use it on the trip to fry other stuff.

Apple Crisp
Apple Crisp


8-10 Granny Smith Apples (dehydrated)
1 teaspoon Cinnamon
Dash of Nutmeg

For topping:
¾ cup of Flour
½ cup Brown Sugar
½ cup Granulated Sugar
1 stick of Butter

Peel and core the Granny Smith Apples and cut into ½ inch slices for dehydrating. To rehydrate apples, add 2 cups boiling water and let sit for at least an hour. To make the topping, combine flour, brown sugar and sugar.  Cut in butter until the mixture is crumbly and the size of small peas. Topping can be made in advance and stored in a zip-lock bag in the cooler. 

Line the Dutch oven with foil and spray with cooking spray. Add the apples with any remaining liquid (should be about 1/2 cup), cinnamon and nutmeg. Sprinkle topping over apples. Set the Dutch oven over coals or charcoal with 1/3 of the coals below, and 2/3 of the coals on the lid (most of the heat should be on the lid). Cook for around 45 minutes, turning frequently to prevent hot spots. Let cool for around 15 minutes before serving. Tasty on its own, but even better with whipped cream. 

If making with fresh apples, peal and slice apples as above, add 1/2 cup of water to the apples with the cinnamon and nutmeg, and top as above.

Monday, December 18, 2023

Winter Camping

We are planning to do an overnight camping trip on New Year’s weekend, so it’s time to think about cold weather camping. At this point, we are not expecting snow, possibly rain and relatively warm temperatures (days in the 40’s, and night in the 30’s), but there are still some things to consider when camping in cold weather.

Tent - a three-season tent will probably work fine for this trip, but a four-season tent is even better. A four-season tent is designed to withstand heavy snow and wind. The tent fabric is heavier and the double wall construction allows it to retain heat better. I'll be using my father's Eureka Expedition Sentinel. You can't find this tent today, but it was originally designed as a mountaineering tent. Here are a couple of advertisements from the late 1980's. 


When pitching a tent in snow, pack down the snow since loose snow is more likely to melt with body heat. Snowshoes work great, or just stamp it down with your boots. I put plastic ground cloths under the tent, and inside for extra protection. When staking a tent in frozen ground, use heavy-duty stakes or nails. In the snow, use snow stakes or a deadman stick. 

Sleeping Bag – to ensure comfort on cold nights, it’s a good idea to use a bag that's rated at least 10° colder than the temperature you will be out in. I have my father's Sumberjack Quallofil winter bag with draft tubes at the zippers, and drawstrings at the shoulders and on the hood to help keep the heat in the bag. I can't tell from the bag itself, but it looks like what they used to sell as the Boundry 0.

Sleeping Pads - in cold weather its best to use two sleeping pads to keep from losing heat to the cold ground - a closed-cell foam pad on the tent floor, and an inflatable pad on top of that. Pads designed for winter use usually have an R-value of about 4.0 or higher. I'll use my father's ¼” closed-cell foam pad and a Klymit Static V insulated pad with an R-value of 4.4. I also have my father's original Therm-a-Rest - they don't make them like that anymore.

Clothes – as always, dress in layers to match the conditions – a base layer next to the skin, then insulating layers to provide warmth, and finally outer layers to protect against rain and wind. Look for synthetic fabrics or wool that dry quickly and wick perspiration away from your body. Don’t forget a hat, gloves and appropriate footwear for the conditions. Be sure to adjust your layering before you over-heat or get cold, and bring warm, dry cloths to sleep in.

Stoves - liquid-fuel stoves like the Whisperlite work fine in below-freezing temperatures. Canister stoves like my Jetboil need to be kept above freezing to produce vapors and work properly. When in doubt, cook on the fire.

Food – your body generates heat as it digests food, so if you’re feeling cold try eating some food. (Moving around will also help.) Before you go to bed, have a snack to keep your metabolism going and keep a candy bar nearby if you get cold in the middle of the night. I don't think we will need to worry about having enough food with this group.

Water - don't forget to stay hydrated. I usually bring jugged water, but in the winter you may need to pump or melt water. 

I'm lucky that my father was a winter hiker, so I have a lot of his old gear. For real winter camping you need to get out in the snow, but we'll try that another time.

Wednesday, October 25, 2023

Planning a Canoe Camping Trip

What’s not to like about canoe camping. You spend the day paddling in nature’s beauty, and then spend the night relaxing around the campfire. I did my first canoe camping trip 2012, and I’ve been hooked ever since. I soon learned, though, that there is more to canoe camping than meets the eye. Planning is the key to a safe and fun trip.

Don't forget to plan for the shuttle
What trip will you do?


Canoe camping trips can run the gamut from easy overnights to month-long excursions, and anything in-between. Choose a trip that fits the group’s skills and schedule. Water levels and weather will determine the best time to run the trip, and the potential hazards you might face. 

For beginners it is a good idea to start off with shorter, easy trips before moving on to longer, more ambitious ones. You will also need to arrange the shuttle in and out, which can add a day or two to each end of the trip.

Crew of five at the end of a trip
Who will you go with?


Your friends of course! If they are not your friends at the start, they will be your friends when you finish. You can solo if you wish, but a group of four to six is my preference. More than that and it can get crowed in camp. Less than that and you may not have enough support if things go wrong. Choose a group with appropriate skills and a willingness to share camp chores.

When deciding on the group, you need to make sure that everyone agrees on the focus of the trip. Some people prefer an easy day of paddling with time in camp for nice meals and adult beverages. Others want to do 40-mile days and have oatmeal for breakfast and dinner (skipping lunch). Make sure the group agrees on where the trip falls in this range.

Chili for dinner
What food will you bring?


The trip you do will definitely influence the food that you bring. On trips where portages are few and weight is not an issue, you can bring coolers filled with fresh food. You will also need cooking gear, which takes up additional space. On trips with portages where every ounce counts, the food is more likely to be dehydrated or freeze dried and cooked on a backpacking stove.

Water jugs of different sizes
Should I bring or collect water?

You will also need a supply of fresh water. Between drinking and cooking, most people will need around 2 liters a day. It is always best to carry in fresh water. You can use a hard jug or water bag. During the trip, it is preferable to resupply from a tap if possible. If you are going to be collecting water from natural sources you will need to boil, chemically treat (Aquatabs) or filter the water before using.

Layering for the conditions
What about clothes?

Canoe camping is a water sport, so you should plan to get wet. Cotton cloths should be avoided. I tend to bring synthetic fabrics rather than more traditional wool. Wools socks are the exception – I never forget the wool socks. Layering allows you to be comfortable regardless of the conditions. Outer layers protect from wind and rain. Inner layers provide insulation. Don’t forget a hat and gloves if gets cold, shoes for camp, and your toiletries.

A roomy campsite
Campsites

Unless you are traveling in the remote wilderness, you will probably be camping in established campsites. The perfect campsite is elevated above the river on a flat section of land that has nice views of the surrounding landscape. If you are lucky, your campsite will have a picnic table with a ridgepole for your tarp, a fireplace, and maybe even an outhouse or thunderbox. Find a level spot for your tent that is away from dead trees and sparks from the fire.

Rain tarp is up - just in case
Tarps


If rain is in the forecast, the first thing that goes up is the tarp. Tarps are usually rigged for protection from rain, but can also be used to protect from sun or wind. A good tarp must be large enough to cover the group and have lots of attachment points. Poles are nice, but tall sticks and paddles work just as well. You’ll need a collection of stakes and guy lines to rig the fly in different configurations.

Home for the night
Tents


There is nothing like waking up in the morning to birds singing and the sun streaming into your tent. Tents have come a long way from the heavy canvas tents of old. The nice thing about canoe camping is that there is room for a bit of extravagance. You don’t need to jam yourself into a tiny one-person backpacking tent, unless you want to. Choose a tent with plenty of headroom, a full fly and good ventilation. 

A room with a view
Sleeping Bags and Pads


Waking up all snug and warm in your sleeping bag can make it tough to think about climbing out of the tent. The sleeping bag you use will depend on the season and the weather. To ensure comfort on cold nights, it’s a good idea to use a bag that's rated at least 10° colder than the temperature you will be out in. The sleeping bag's fill can be down or synthetic. Down bags pack small, but can be difficult to dry if they get wet. Synthetic bags are bulkier, but are easier to dry. 

A good sleeping pad can make sleeping on the ground not just bearable, but quite comfortable. Sleeping pads have two functions - comfort and insulation. The simplest is a thin closed cell foam pad. Inflatable hiking pads pack small and have come a long way in terms of comfort and durability. Combination pads that inflate but also contain foam like the original Therm-A-Rest are also available. Pads designed for colder weather usually have an R-value of 4.0 or higher. 

Camp kitchen for a large group
Camp Kitchen


Your kitchen kit should include pots, pans and utensils. A good frying pan and large pot are essential, and you will also need a knife, spatula, serving spoon and tongs. Long handles make it easy to work around the fire, and fireproof gloves are a nice addition. Don’t forget a scrubber and biodegradable soap for the dishes, trash bags to pack out garbage. 

You will also need to decide if you will cook on the fire or the stove, or both. If you cook on the fire you will need a grill or fire grate, and your pots and pans will get covered in black soot – a badge of honor for many camp cooks. A plastic bag will keep the grime from your pots and pans off your other gear.

Sitting around the evening fire
Campfire


When a campfire cook has passed through a campsite you can always tell by the fire pit. It will be clear of ash and debris allowing ample room for wood under the grill. If it is round, it will be large with multiple cooking spots depending on the type of cooking to be done and the heat needed. Or it will be “U” shaped and just wide enough to support the grill.

When collecting wood you will need a mixture of sizes from small to large - tinder to light the fire, kindling to establish the fire and fuel to feed the fire. Firewood should be collected selectively to leave the site and scenery as undisturbed as possible. Softwoods are usually easier to find and burn the fastest. Hardwoods produce a cleaner, longer lasting fire and better coals. Make sure your matches are stored in a waterproof container. 

The morning coffee
For cooking, keep the fire contained under the pots and pans. It is often easier to cook with small sticks rather than large logs. The most important part of the cooking fire is the height of the grill – too low and it will be tough to get wood underneath, too high and it will take a lot of wood. A grill grate at 8” to 10” seems to work best. Shift the pans around to get the heat that you need and prevent hot spots.

You should always leave the campsite better than you found it, and that is especially true of the fire pit. Make sure everything that you place in the fire gets burned completely. Never burn foil, plastic, styrofoam, bottles or cans. Don’t leave anything behind, except perhaps a pile of dry wood for the next campers.

Backpacking stove with a cozy
Stoves


When I started canoe camping everything was cooked on the stove. Over time I have gravitated more to cooking on the fire, but that doesn’t mean that you shouldn’t bring a stove along. When firewood is not available, in bad weather, or if you run out of daylight a stove may be needed. Stoves range from two-burner base camp models like the classic Coleman stove, to small backpacking stoves. Having a wind shield or cozy will significantly increase the stove's efficiency.

Splitting wood - be careful
Axe/Hatchet or Saw


An axe or hatchet is good to have along to split wood - especially when conditions are soggy. Remember though that splitting wood is one of the most dangerous things that you can do in camp. A saw is a must for gathering and cutting firewood. I usually bring two – a straight, folding saw for gathering wood, and a folding bow saw for cutting it into lengths.

Dinner by lantern light
Lanterns and Flashlights


One of my memories of camping as a kid was lighting my father’s white gas Coleman lantern with silk mantles. It was very bright and made a unique sound when lit. Today, there are lots of small battery powered lanterns that produce the same light and are easier to carry. A headlamp is essential for working in the dark, and a flashlight is good to bring along as a backup.

Drybags ready to be loaded
Dry Bags and Barrels


Comfortable camping is all about keeping your gear dry, and drybags and barrels allow you to do that. Vinyl drybags are the most durable, but nylon coated drybags are lighter and easier to compress to fit in small spaces. I use both. Drybags use a roll-down top and heavy clips to create a water tight seal. Some come with pack straps for easy portaging.

I double bag critical items that need to stay dry (sleeping bag, camp clothes) in smaller nylon drybags before packing in the larger vinyl drybag. I also use mesh bags to organize things that I tend to use together. For me, two large dry bags (one for my tent, clothes and sleeping gear, and one for everything else) and a small day bag seem to work right. I know – I don’t pack light. I need to work on that.

Barrels provide a waterproof and animal proof alternative to drybags. They are especially good for storing food, and have the added benefit of serving as chairs and tables in camp.

On the portage trail
Portages


If portaging is part of the trip you will definitely need to pack light. I usually pack for a two carries – the first with my boat and lighter dry pack, the second with my heavier dry back, day bag and anything else.
 In some areas, a portage cart can be used on rock and root-free trails. On rivers, wading or lining may be an alternative to portaging, and you might be able to run easier rapids empty. 

Enjoying a safe trip
Staying Safe


Safety on a canoe camping trip is just like safety for any other paddling trip - except that you are paddling a loaded tripping canoe and may be days away from potential help. You will need to know the conditions (recognizing that conditions can change quickly), know your group and its skills, and plan accordingly. 

The best way to stay safe is to anticipate what can go wrong, and avoid it. The two most common issues that you will face are whitewater and wind. Whitewater rapids that can easily be run in an empty boat might be significantly more difficult in a loaded tripping canoe. The same is true for long crossings across wind swept lakes. Portaging rapids and sitting out windy days are often the best strategy. 

You should dress for the conditions and always wear your PFD. You should bring appropriate safety gear including a first aid kit, throw bag/tow line and pin kit. You will also need to bring appropriate navigation and communication equipment. In remote areas, a satellite communication device will keep you in touch and allow you to send and receive messages in case of an emergency.